Sand Blocks Level 480 Walkthrough & Answers
ExpertLevel 480 video solution · 3:44 · 1.5K views · published September 2026
Watch on YouTube →- Difficulty
- Expert
- In its tier
- 231 of 451
- Through the game
- 69%
- Walkthrough
- 3:44
- Views
- 1.5K
If Sand Blocks Level 480 keeps resetting on you, watch one correct run first. It is an Expert board — the 231st of 451 in that tier, about 69% of the way through the game. Follow the run above for the order, and use the steps below to check your own board against it.
Level board
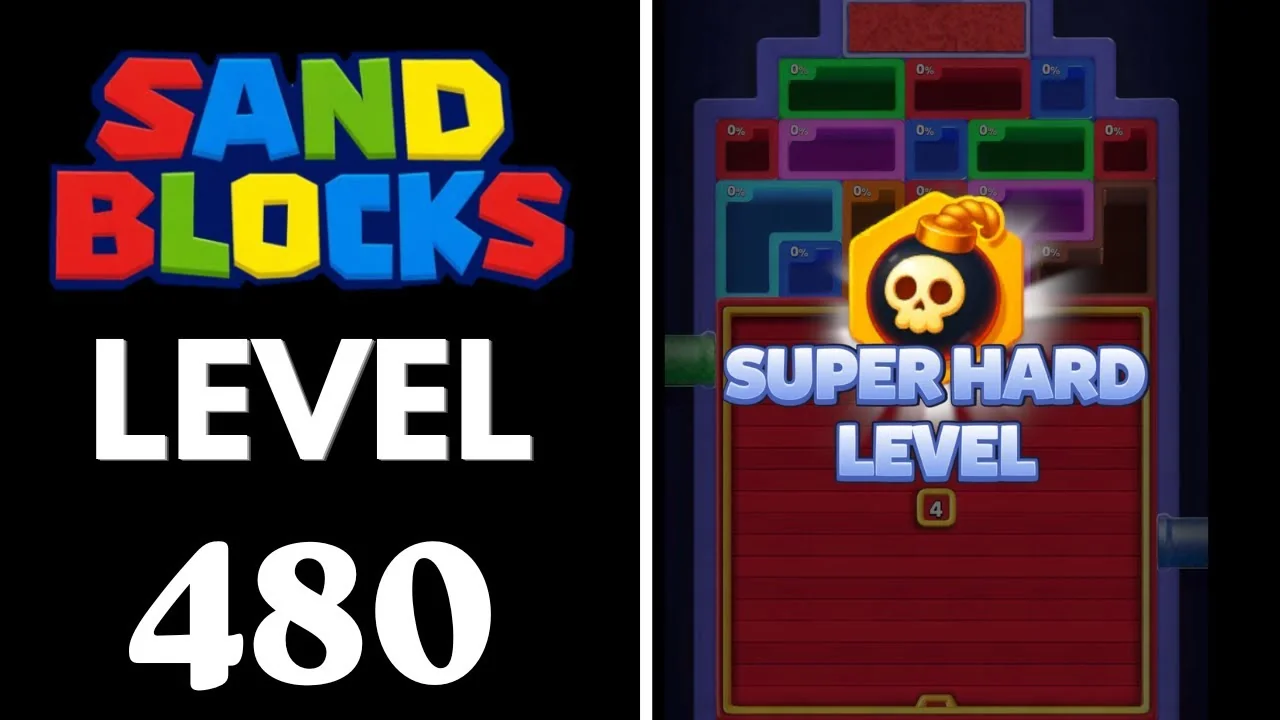
How to clear Sand Blocks Level 480
A frame-by-frame guide to Sand Blocks level 480: a red pane at 3 bursts at 0:17, a frosted pane counts 6 down to 1, three mouths work at once, and the brown tail lands with seven seconds left.
Step-by-step walkthrough
Prefer screenshots to video? Every key moment of the clear is below in order, with a before/after frame and the lock counts either side of the move. Keep it open next to the game and follow along.
Level 480 is a three-mouth level behind a two-pane gate. A yellow top tube, a green mouth on the left edge and a right-edge mouth that changes colour twice all work from the first second, but the lower two-thirds of the board are sealed under a red glass pane with a gold badge of 3. That pane bursts at 0:17 and is replaced by a cracked frosted pane carrying a 6, which counts itself down as the run goes on.
Every pit that reaches 100 percent knocks exactly one off every remaining badge. That is why the panes behave like a second clock: the openings arrive on completions, not on time, and the first hundred seconds are decided by how many pits you can finish while the frosted pane is still standing.
The clear lands at 3:37 on a 3:45 clock, seven seconds to spare. The frames below are before/after pairs from the run in the video above: left is the board before the change, right is after.
Level 480 at a glance
| Detail | Level 480 |
|---|---|
| Difficulty | Expert |
| Timer | 3:45 |
| Colours on the board | Yellow, green, cyan, magenta, pink, orange, brown, purple, grey |
| Sand feeds | Yellow top tube, green left mouth, right mouth that switches twice |
| Right mouth order | Cyan to magenta at 0:55, magenta to orange at 2:16 |
| Panes | Red pane 3 bursts 0:17; frosted pane 6 counts to 1 and is gone by 1:42 |
| Clear time | About 3:37 |
| Time left at the clear | About 7 seconds |
| Source run | The video solution above |
The shape of the level is simple once you know it: the two panes are the gate for the first hundred seconds, the middle minute is one long thinning, and the last forty seconds are a colour-matching exercise between the yellow top tube and the orange right mouth.
The ten-step route
| # | Time | What happens | Where it happens |
|---|---|---|---|
| 1 | 0:04-0:17 | The red pane badge runs 3 to 1 and the pane bursts | Lower two-thirds |
| 2 | 0:18-0:30 | A cracked frosted pane with badge 6 takes over and the pit band opens | Mid-left and top band |
| 3 | 0:30-0:50 | The first completion at 0:47 ticks every badge down | Centre |
| 4 | 0:50-1:00 | The right mouth turns cyan to magenta at 0:55; a blue bar clears at 0:54 | Right edge |
| 5 | 1:00-1:22 | Green bars expand and the orange L grows; blue pits vanish at 1:18 | Top and left |
| 6 | 1:22-1:40 | The magenta block clears at 1:23 and the whole board re-packs | Centre |
| 7 | 1:40-2:04 | The last glass lock disappears at 1:42 and the top third opens at 2:04 | Mid-left to top |
| 8 | 2:04-2:26 | Re-packs at 2:10, 2:14 and 2:18; the right mouth turns orange at 2:16 | Centre and right |
| 9 | 2:26-3:10 | Yellow on top, orange on the right; clears at 2:40, 2:48 and 2:58 | Whole board |
| 10 | 3:10-3:37 | Brown tail: one orange 4-cell and one brown pit finish | Bottom and centre |
Step 1 - The red pane bursts (0:04-0:17)
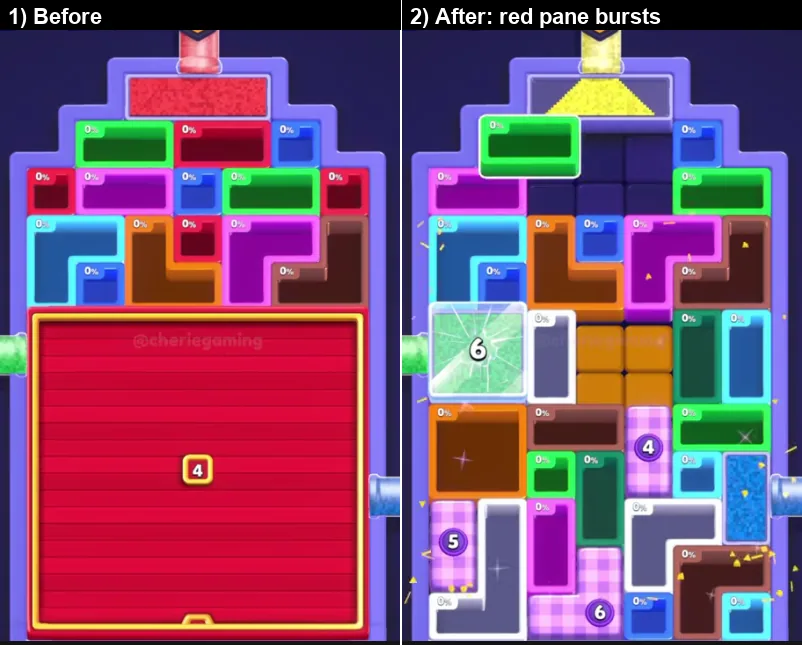
The board opens with a red glass pane over the lower two-thirds, gold badge 3, while the top tube pours yellow sand onto the strip of pits above it. The badge runs 3 to 1 and the pane bursts at 0:17.
- What to do: work only the strip above the pane until it bursts.
- Why it works: the covered board cannot take sand, so the strip is the entire scoring area for the first seventeen seconds.
- Do not: touch the pane. It opens on completions, not on taps.
Step 2 - The frosted pane takes over (0:18-0:30)
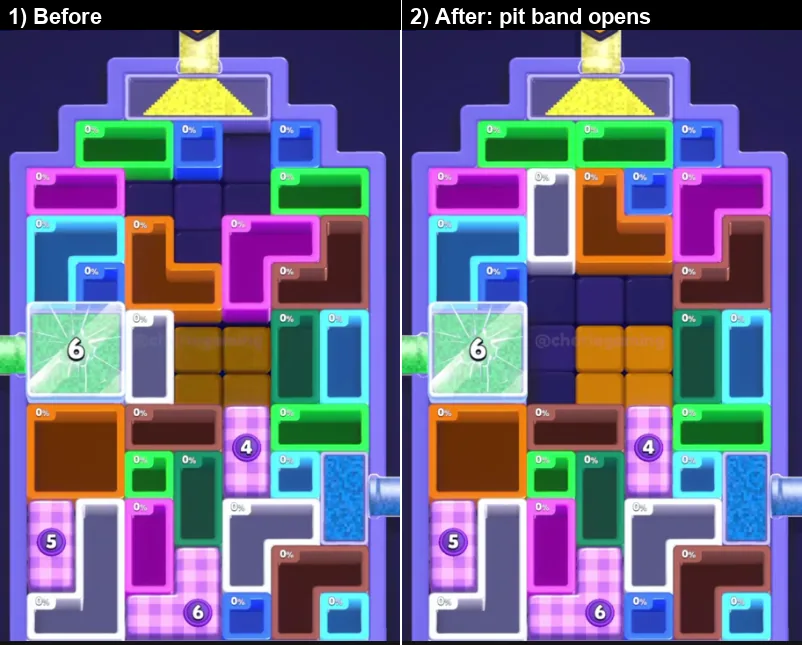
With the red pane gone, a cracked frosted pane carrying badge 6 appears at the mid-left and the pit band spreads across the top. Green, purple, blue, magenta, dark-red, brown and cyan pits all appear and start filling, and the board sits one layer higher.
- What to do: pick the shortest pit in the new band and finish it, because 6 is a long countdown.
- Why it works: the frosted pane is the level's pacemaker; every completion you bank early saves a second later.
- Do not: spread sand over several pits. The badge only moves on a 100 percent pit.
Step 3 - First completion, every badge down (0:30-0:50)
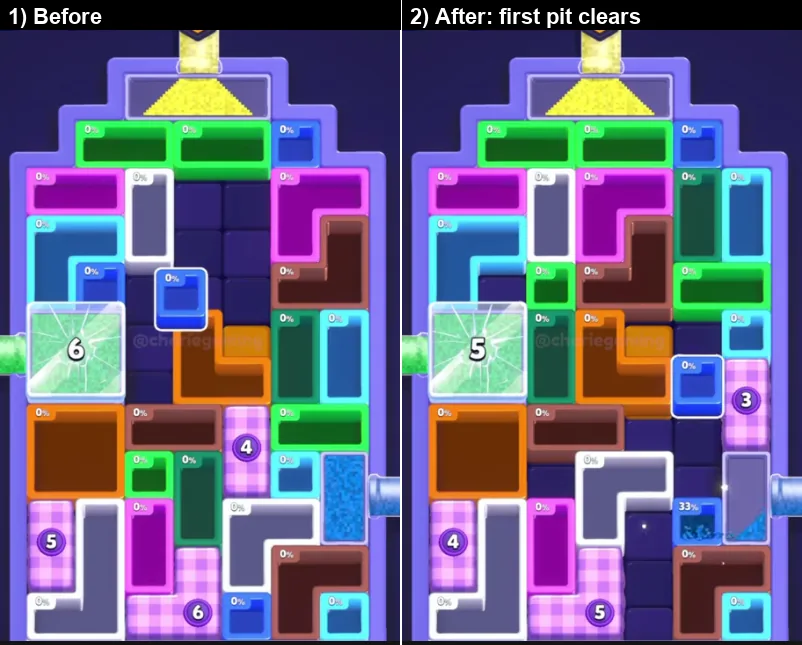
At about 0:47 one pit completes and the whole badge wall drops one: the frosted pane goes from 6 to 5, the purple pit from 4 to 3, the pink pit from 5 to 4. The board shifts but does not fully re-pack.
- What to do: treat each completion as a discount on every badge you can see.
- Why it works: the small counters around the board fall at the same rate as the big one, so a pit that finishes here may also delete three pits elsewhere.
- Do not: ignore the small badges. They are the pits that disappear for free.
Step 4 - The right mouth switches (0:50-1:00)
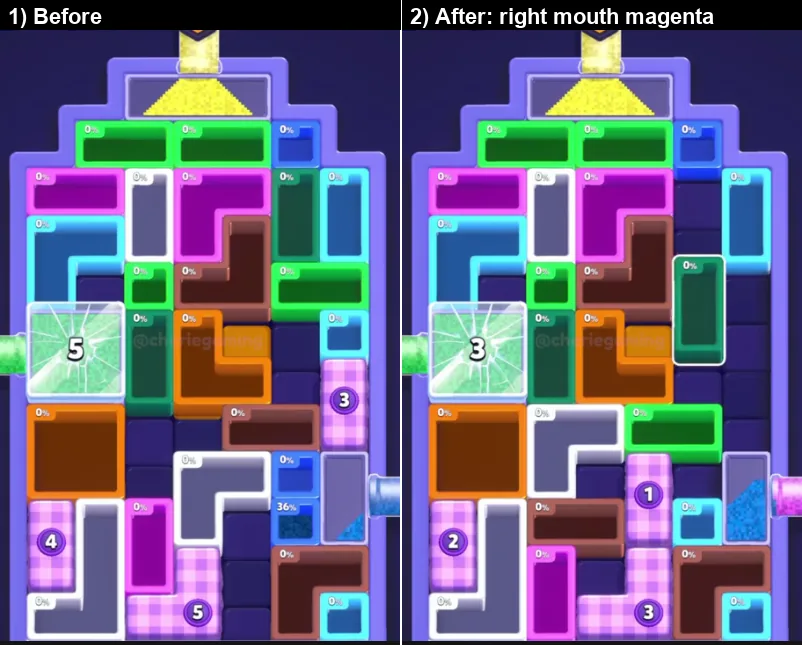
The right-hand mouth changes from cyan to magenta at about 0:55, and a blue bar on the right edge reaches 100 percent at 0:54 and clears. The frosted pane ticks from 5 to 4 and then to 3.
- What to do: finish every cyan pit before 0:55; the mouth never returns to cyan.
- Why it works: a mouth's colour is a deadline, and this one is unusually sharp: the switch happens while a bar is mid-fill.
- Do not: leave a cyan pit half full and expect the magenta stream to help.
Step 5 - Green bars and the orange L (1:00-1:22)
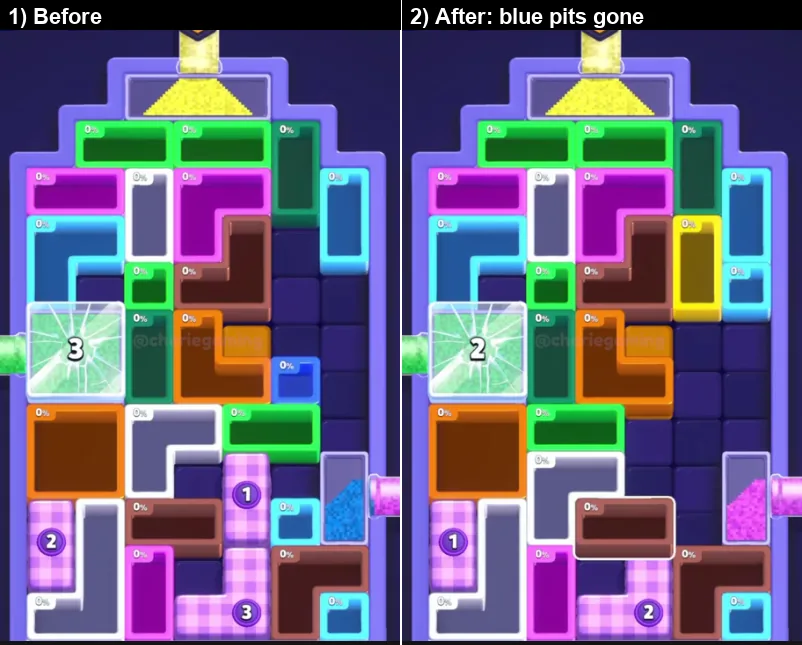
For twenty seconds the green bars on the top and left expand, fed by the yellow top stream and the green left mouth, and the orange-brown L in the centre grows. At 1:18 the blue pits disappear as a group.
- What to do: use the left mouth for the short blocks and leave the tall pits to the top stream.
- Why it works: two steady feeds let you work two shapes at once without dragging either.
- Do not: move a green bar off the left mouth. The left feed is quiet and reliable, which makes it the cheapest lane on the board.
Step 6 - The magenta block clears (1:22-1:40)
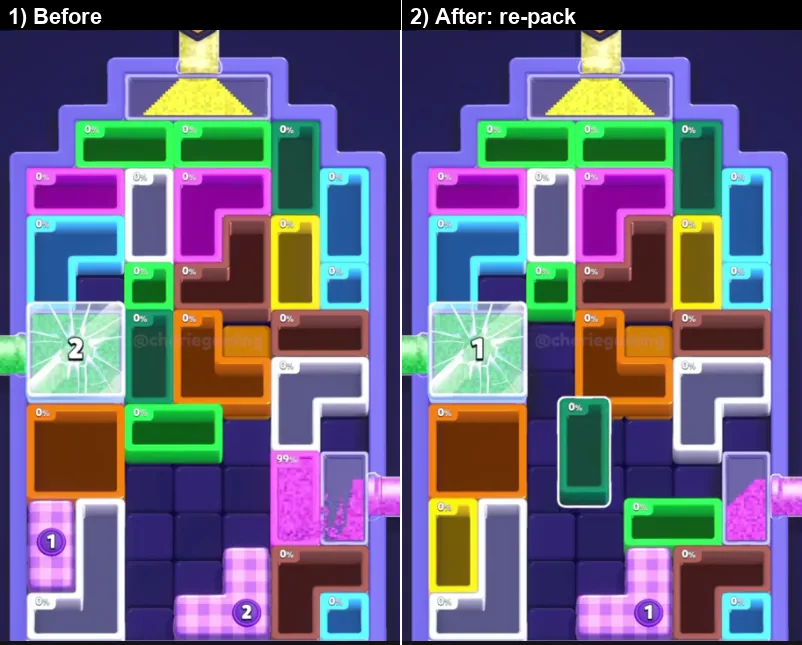
The big magenta block clears at about 1:23 and the board re-packs completely. The frosted pane drops from 3 to 1 at 1:22.5, and a new layout of green bar, orange bar and grey pits appears and stays almost static for fifteen seconds.
- What to do: read the new layout before moving; the biggest clear of the run just rewrote the board.
- Why it works: the largest single clear always arrives right after the mouth becomes the colour that block needed.
- Do not: chase a specific colour in the static window. It is a parking phase, not a scoring phase.
Step 7 - The last glass lock (1:40-2:04)
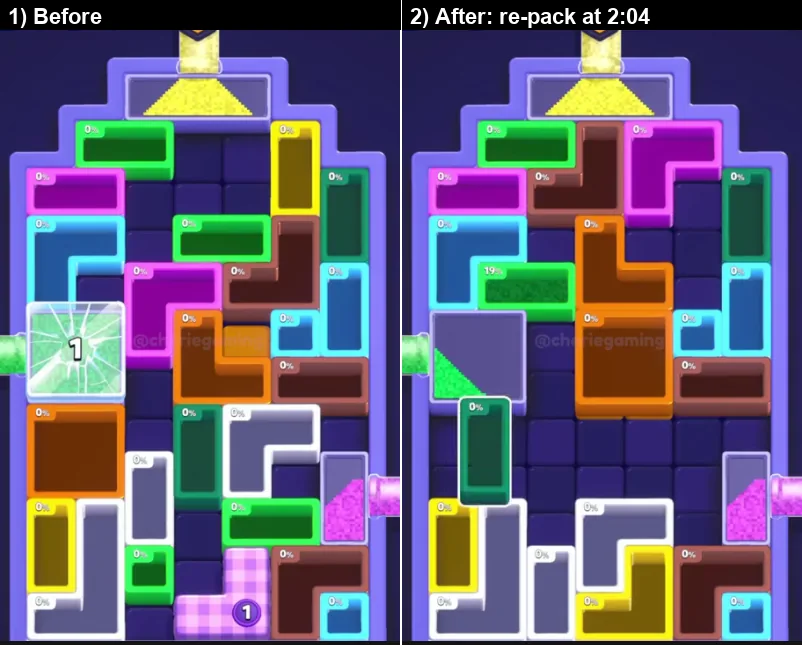
The last cracked glass lock, carrying badge 1, disappears at about 1:42. The magenta L, the left green wedge and the yellow bar in the upper right fill in turn, and at 2:04 several pits clear together and the top third opens into empty grid.
- What to do: bank the 2:04 wave by having matching pits under both live mouths.
- Why it works: once the locks are gone the board thins in waves rather than one pit at a time.
- Do not: stop working the top stream after the locks disappear. The gate is gone but the sand is not free.
Step 8 - The board thins (2:04-2:26)
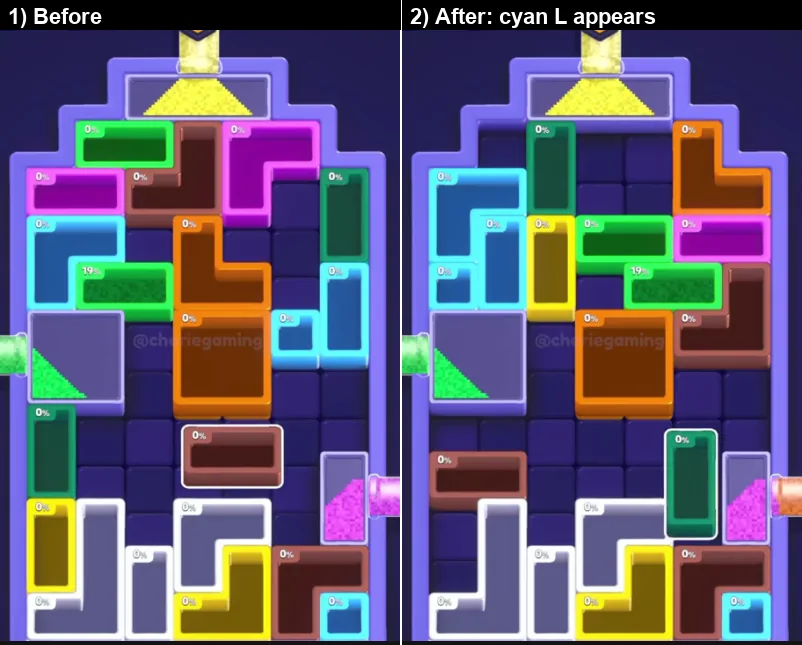
Re-packs land at about 2:10, 2:14 and 2:18, and the right mouth changes from pink to orange at 2:16. A new cyan L and green bars appear and rise, while the big yellow L at the bottom never moves, because it is the anchor of the layout.
- What to do: use the three re-packs to keep re-parking pits under the yellow top stream.
- Why it works: every re-pack brings a fresh pit into the top lane, which is the only stream that never changes colour in this stretch.
- Do not: try to move the yellow anchor. It is a fixed piece of the layout.
Step 9 - Yellow top, orange right (2:26-3:10)
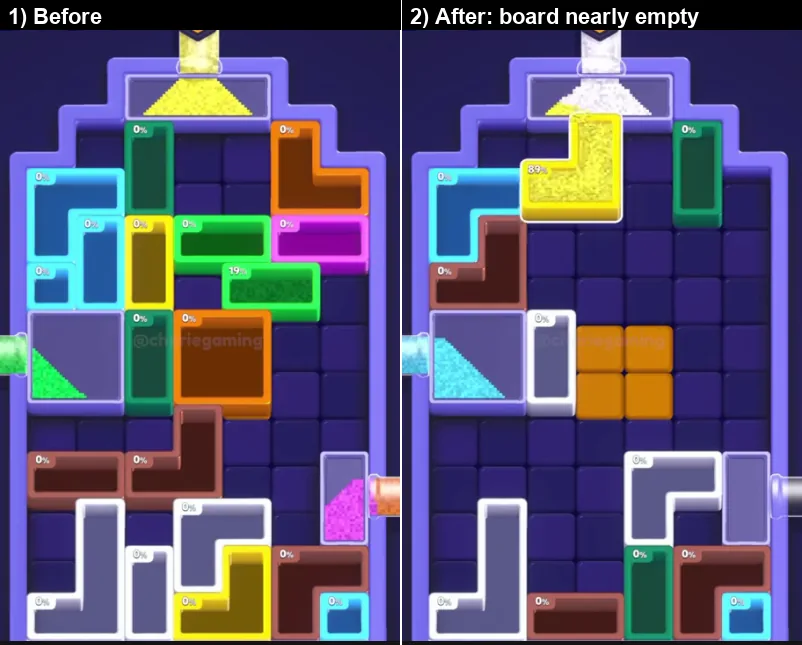
Yellow runs on the top stream and orange on the right. The remaining magenta and blue-green pits clear in clusters at about 2:40, 2:48 and 2:58, and by 3:10 only four or five pits are left on the board.
- What to do: split the board in half: top stream on the tall shapes, right mouth on the short ones.
- Why it works: with the board this thin, every drop counts, and two live colours double the fill rate.
- Do not: carry a pit from one half of the board to the other. The drag costs more than the fill saves.
Step 10 - The brown tail (3:10-3:37)
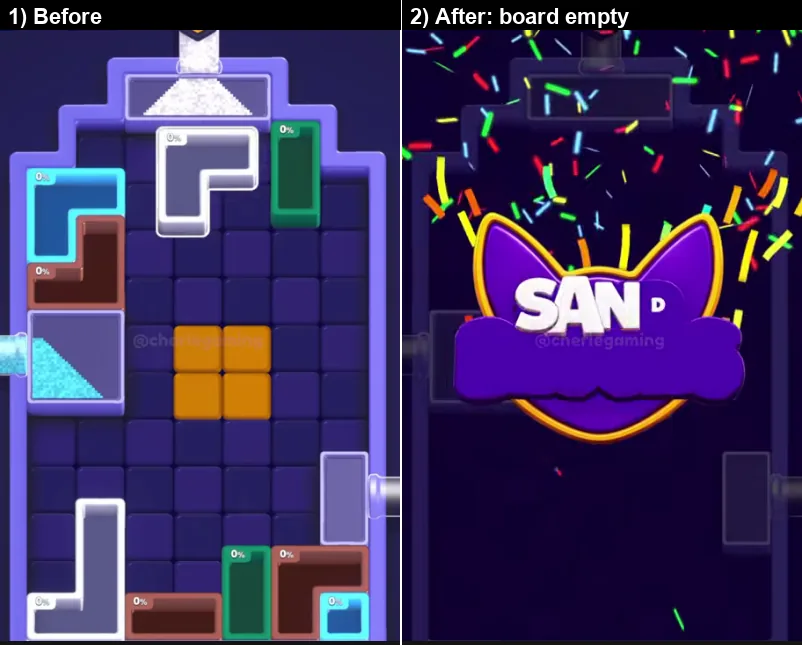
The top tube runs to white and then brown at about 3:18, and only one orange four-cell block and one brown pit remain. Both clear at 3:37 with seven seconds on the clock, and the rewards card lists Rewards 40 and x2 Coins 80.
- What to do: keep one pit free for the tail colour and finish the brown pit with the brown stream.
- Why it works: the tail colour decides the last block, and on this run the last block was brown.
- Do not: spend the final fifteen seconds dragging a four-cell block that the brown stream cannot help.
What each colour is doing
| Colour | Role on Level 480 |
|---|---|
| Yellow | The backbone. The top tube feeds it nearly the whole run, and the big yellow L at the bottom is a fixed anchor. |
| Green | A steady quiet feed from the left mouth, used for short blocks while the top stream works a tall one. |
| Cyan | The right mouth's opening colour, gone after 0:55. Anything cyan must be finished before then. |
| Magenta | The right mouth from 0:55 to 2:16. It produces the biggest single clear of the run at 1:23. |
| Orange | The right mouth from 2:16. Late colours are the fast ones because the board is already thin. |
| Brown and grey | The tube tail plus the grey glass locks. They close the run. |
| Red pane 3 and frosted pane 6 to 1 | The gate. They burst at 0:17 and disappear by 1:42, and each completion knocks one off them. |
Three rules that carry the level
- One completion, every badge down. A single 100 percent pit discounts the whole board. Big clears are worth far more than many half-filled ones.
- A mouth's colour is a deadline. Cyan on the right ends at 0:55 and magenta at 2:16. Whatever is leaving must be finished first, and whatever arrives becomes the fast lane.
- Re-packs reset everything. Three full re-packs at 0:17, 1:23 and 2:04 redraw the board. Re-read the layout after each one instead of sliding from memory.
Common mistakes on level 480
- Working the covered board. Before 0:17 the lower two-thirds are behind glass.
- Leaving a cyan pit alive past 0:55. The right mouth never returns to cyan.
- Moving the yellow anchor. The big yellow L at the bottom is a fixed piece of the layout.
- Treating 1:22 to 1:40 as dead time. It is the parking window that makes the 2:04 wave possible.
- Ignoring the tail colour. The last block is decided by whatever the tube pours after 3:15.
Quick reference
Red pane 3 to 1 and bursts at 0:17 -> frosted pane 6 takes over -> first completion at 0:47 -> right mouth cyan to magenta at 0:55 -> blue pits vanish at 1:18 -> magenta block clears at 1:23 and re-packs the board -> last glass lock at 1:42, top third opens at 2:04 -> right mouth to orange at 2:16 -> clears at 2:40, 2:48 and 2:58 -> brown tail at 3:37 with seven seconds left.
The video solution is embedded at the top of this page, and every timestamp refers to that recording.
Where Level 480 sits in Sand Blocks
Level 480 is the 231st of 451 Expert boards in Sand Blocks: Drop Puzzle, and about 69% of the way through the 700 levels this guide currently covers.
Expert boards run from Level 250 to Level 700, and this page covers the 231st of them, in the later half of the tier.
It sits between Level 479 and Level 481, inside the 441-480 block of the level index.
The walkthrough above runs 3:44 and shows the clear start to finish.
More expert walkthroughs
View all →
Sand Blocks Level 480 FAQ
How do I beat Sand Blocks Level 480?
Follow the step-by-step walkthrough below. It splits the clear into ten key moments, shows the lock counts before and after each move, and gives the full green-to-red order for the 3:00 timer.
What difficulty is Level 480 in Sand Blocks?
Level 480 is rated Expert difficulty in Sand Blocks: Drop Puzzle — the 231st of 451 boards in that tier, and level 480 of 700 overall.
Is there a video walkthrough for Sand Blocks Level 480?
Yes — this page includes the full 3:44 video walkthrough, plus the written pull-order steps beneath it. You can also watch it directly on YouTube.
Featured walkthroughs
The levels players search for most - each with a full video guide.