Sand Blocks Level 490 Walkthrough & Answers
ExpertLevel 490 video solution · 3:33 · 1.1K views · published October 2026
Watch on YouTube →- Difficulty
- Expert
- In its tier
- 241 of 451
- Through the game
- 70%
- Walkthrough
- 3:33
- Views
- 1.1K
Here is a complete Sand Blocks Level 490 clear. It is board 490 out of 700, rated Expert (241st of 451 in that tier). Follow the run above for the order, and use the steps below to check your own board against it.
Level board
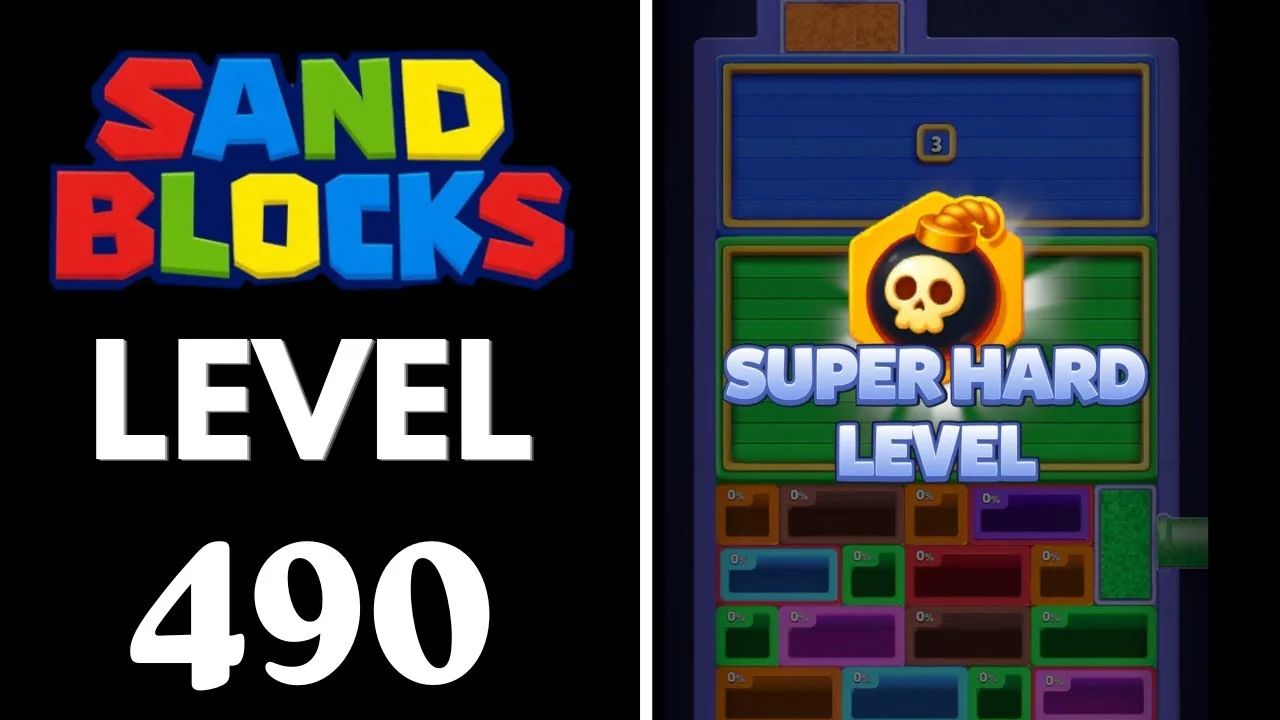
How to clear Sand Blocks Level 490
A frame-by-frame guide to Sand Blocks level 490: a green pane at 4 and a blue pane at 3 burst and slide the board up, the top tube cycles four colours, and the last blocks land with three seconds left.
Step-by-step walkthrough

Prefer screenshots to video? Every key moment of the clear is below in order, with a before/after frame and the lock counts either side of the move. Keep it open next to the game and follow along.
Level 490 is a two-pane cascade on a 3:20 clock, and it finishes with three seconds to spare, which makes it the tightest board in this set. Two large glass panes with gold badges cover the upper half: a green one carrying 4 and a blue one carrying 3. Each pane pours its own sand into the board, ticks its badge down as it delivers, and bursts at 0, which slides the whole pit mosaic up by one pane height.
Sand arrives from two places only: a top tube that changes colour four times and a side tube on the right that changes three times. Nothing fills unless a pit is sitting directly under one of those streams, so a badly parked pit is the same as no pit at all.
The clear comes at 3:23. The pairs below are before/after frames from the run in the video above, left for before and right for after. Watch the panes in the first minute; after 1:00 the run is entirely about parking.
Level 490 at a glance
| Detail | Level 490 |
|---|---|
| Difficulty | Expert |
| Timer | 3:20 |
| Colours on the board | Orange, red, cyan, green, magenta, yellow, purple, brown, white |
| Panes | Green pane 4 and blue pane 3, bursting at 0:23 and 0:57 |
| Top tube order | Orange, light blue, magenta, yellow |
| Side tube order | Green, white, red |
| Clear time | About 3:23 |
| Time left at the clear | About 3 seconds |
| Source run | The video solution above |
Two rules explain almost every second of the run. First, the panes deliver sand for free, so every pit finished while a pane is up is paid for by the level rather than by your clock. Second, when a pane bursts the mosaic slides up one full pane height, so any position you memorised is obsolete.
The ten-step route
| # | Time | What happens | Where it happens |
|---|---|---|---|
| 1 | 0:04-0:12 | Green side sand turns the right magenta pit into a bar; the green pane ticks 4 to 3 | Right edge and green pane |
| 2 | 0:12-0:23 | The green pane runs 3, 2, 1, 0 and bursts; the board slides up | Lower pane |
| 3 | 0:23-0:44 | Red T pits fill under the orange stream; the blue pane goes 3 to 2 | Top-left and centre |
| 4 | 0:44-0:57 | The blue pane runs 2, 1, 0 and bursts at 0:57 | Top pane |
| 5 | 0:57-1:28 | Orange-only grind: the board creeps, nothing finishes | Whole board |
| 6 | 1:28-1:48 | First chain of clears; four re-packs in twenty seconds | Upper half |
| 7 | 1:48-2:08 | Orange pits complete and the top tube turns light blue at 2:02 | Centre-left |
| 8 | 2:08-2:40 | Light-blue phase: cyan and purple fill, big re-pack at 2:30 | Centre and bottom |
| 9 | 2:40-3:06 | Red side-tube phase; clusters clear at 2:44 and 3:00 | Right edge and centre |
| 10 | 3:06-3:23 | Magenta then yellow tail: the last yellow 2x2 and red 2x2 clear | Top-right and centre |
Step 1 - Green from the side tube (0:04-0:12)
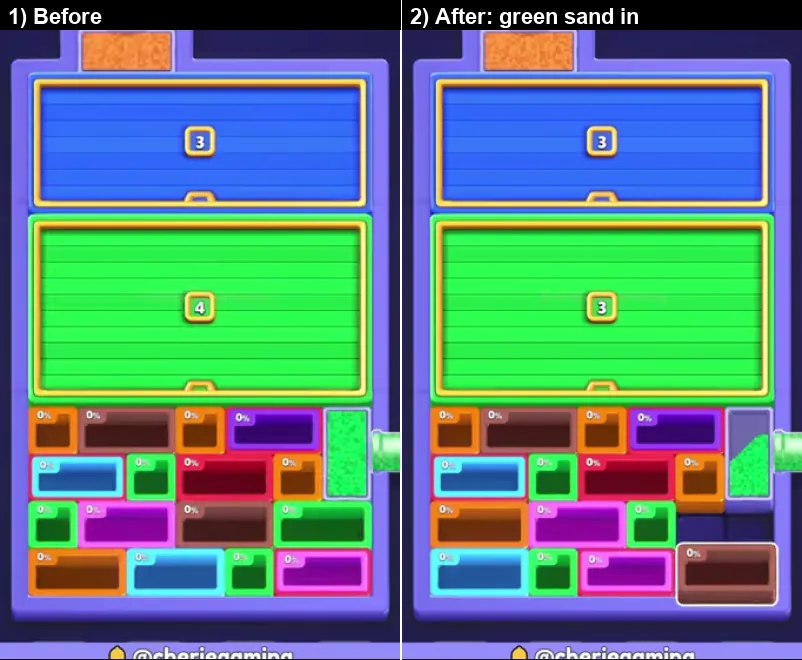
The level opens with orange sand in the top tube and green sand in the right side tube, with the blue pane at badge 3 and the green pane at badge 4. The magenta pit on the right is filled into a long bar and moved, and the green pane ticks down to 3.
- What to do: use the side tube while the panes still cover the board.
- Why it works: the side stream is the opening engine, and the only pits reachable in the first seconds are on its edge.
- Do not: try to reach the middle of the board yet. It is behind glass.
Step 2 - The green pane bursts (0:12-0:23)
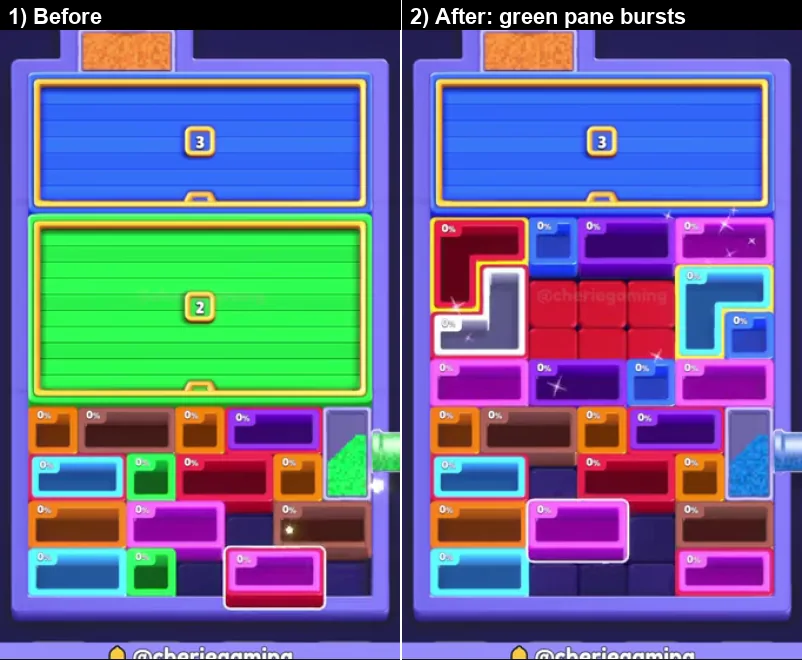
The green pane badge runs 3, 2, 1, 0 while the side tube keeps pouring, and at about 0:23 the pane bursts. The whole pit mosaic slides up under the blue pane and the bottom row is replaced with new pits: orange, brown, cyan and magenta.
- What to do: re-read the board immediately after the burst; the layout moved by a full pane height.
- Why it works: the slide is a free re-pack, so the pits that were under the stream a second ago are now one row higher.
- Do not: keep dragging toward the old position of a pit.
Step 3 - Red T pits under orange (0:23-0:44)
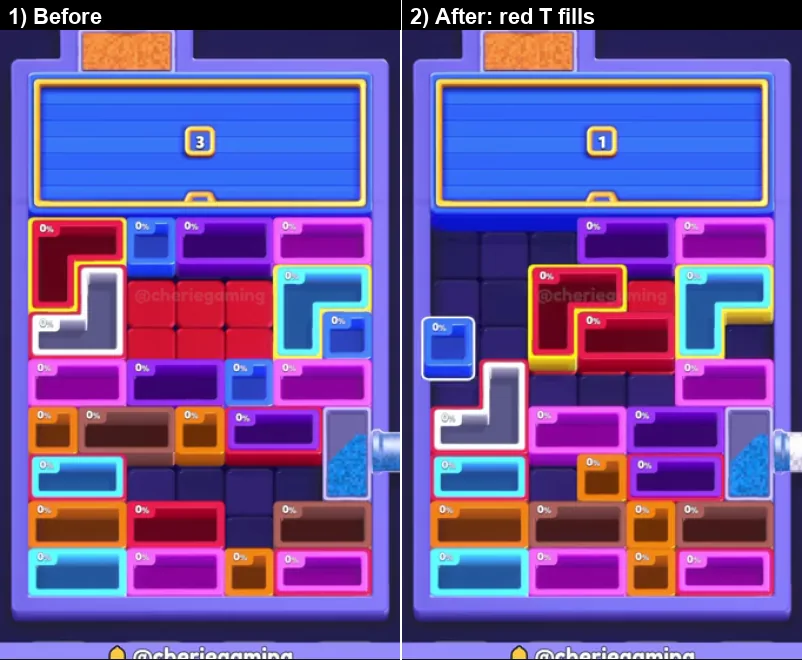
With the board one layer higher, the top tube's orange stream lands on the red T-shaped pits in the upper-left and centre. The red blocks spread across the upper-left, the pane keeps delivering, and the blue badge drops from 3 to 2.
- What to do: centre the orange stream on the T and leave it there.
- Why it works: a T shape has a wide crossbar, so it collects sand at the highest rate of any shape on the board.
- Do not: pull the stream sideways to catch a second pit. The T pays more than two small ones.
Step 4 - The blue pane bursts (0:44-0:57)
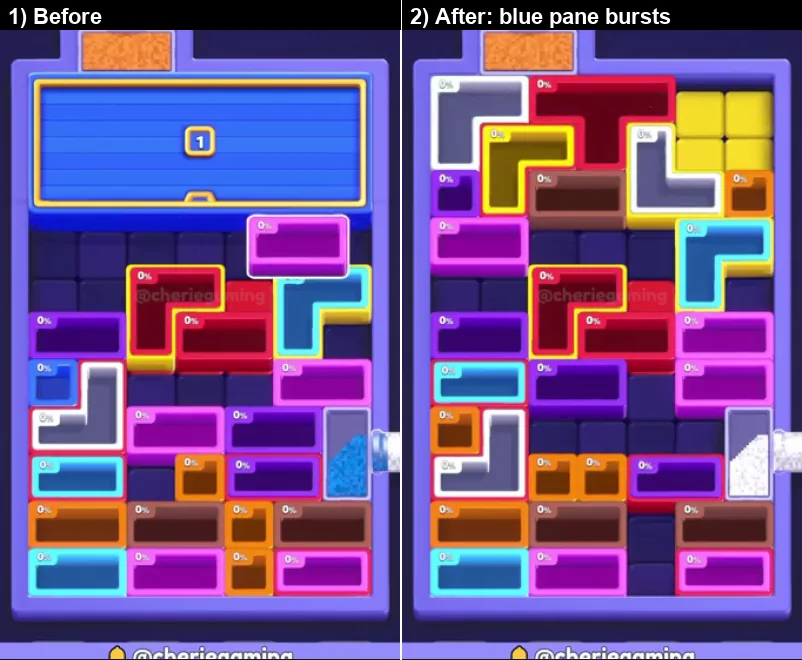
The blue pane badge goes from 2 to 1 to 0 and bursts at about 0:57. This is the second full re-pack: both panes are now gone, the pit board fills the whole frame, and orange sand falls straight onto the top row.
- What to do: treat 0:57 as the start of the real level and rebuild your plan.
- Why it works: with no panes left, the board no longer moves on its own. From here only your drags change the layout.
- Do not: wait for another cascade. There is none.
Step 5 - The orange-only grind (0:57-1:28)
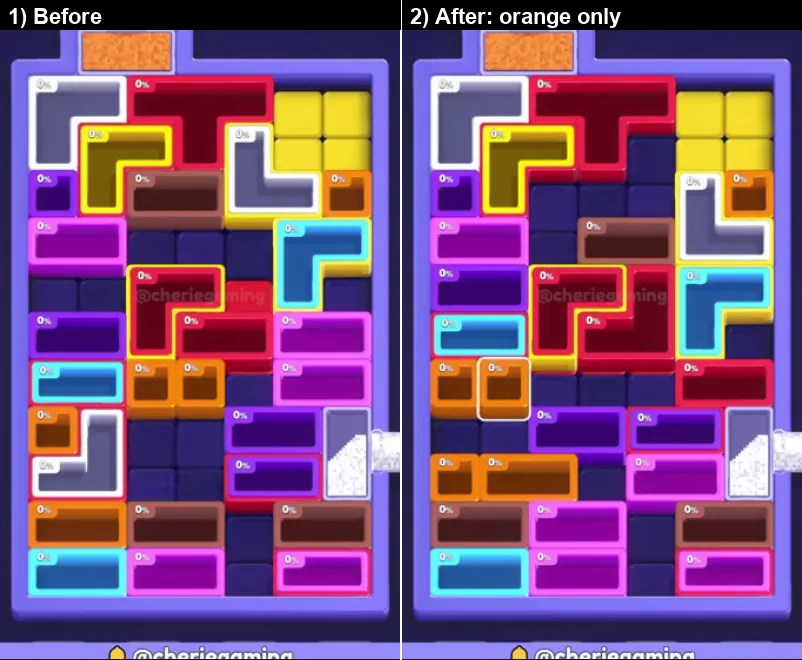
For half a minute the only live stream is the orange top tube; the side tube holds white sand that hardly moves. Pits are re-parked under the orange stream and nothing finishes.
- What to do: park the tallest pit directly under the orange stream and accept the slow rate.
- Why it works: one stream means one pit grows at a time. The only variable you control is which pit.
- Do not: switch to a wider pit halfway. The fill you already paid for is lost.
Step 6 - The first chain of clears (1:28-1:48)
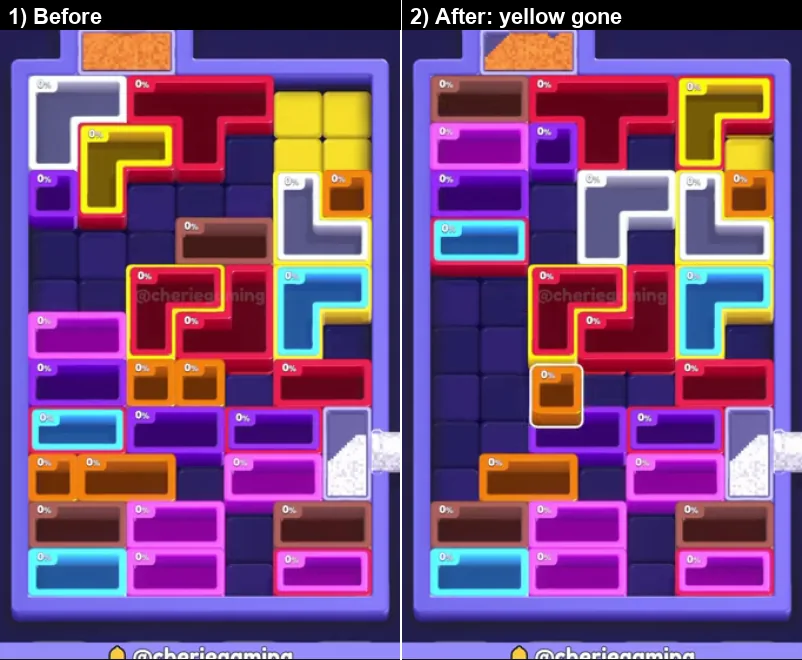
The board suddenly starts clearing: re-packs land at about 1:28, 1:30, 1:36 and 1:42. The yellow block and the purple and magenta pits leave the board and the mosaic begins to thin.
- What to do: keep feeding the pit nearest the stream during the wave; each clear promotes a new pit into range.
- Why it works: after a long grind the parked pits all complete within a few seconds of each other.
- Do not: leave the stream idle between clears. The next pit is already available.
Step 7 - Light blue arrives (1:48-2:08)
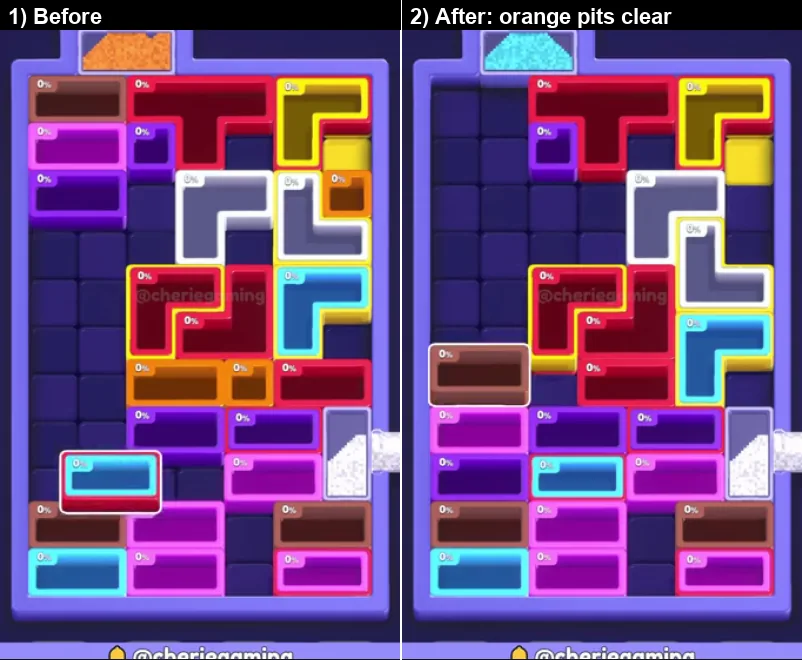
The orange pit on the centre-left fills to 100 percent and clears. The top tube runs dry at about 2:00 and turns light blue at 2:02, and a large re-pack lands at 2:08.
- What to do: re-read the board the second the tube changes colour.
- Why it works: a colour change invalidates half the board and promotes the other half, so the fastest pits are never the ones you were working a second earlier.
- Do not: keep filling orange pits after 2:02. There is no orange left.
Step 8 - The light-blue phase (2:08-2:40)
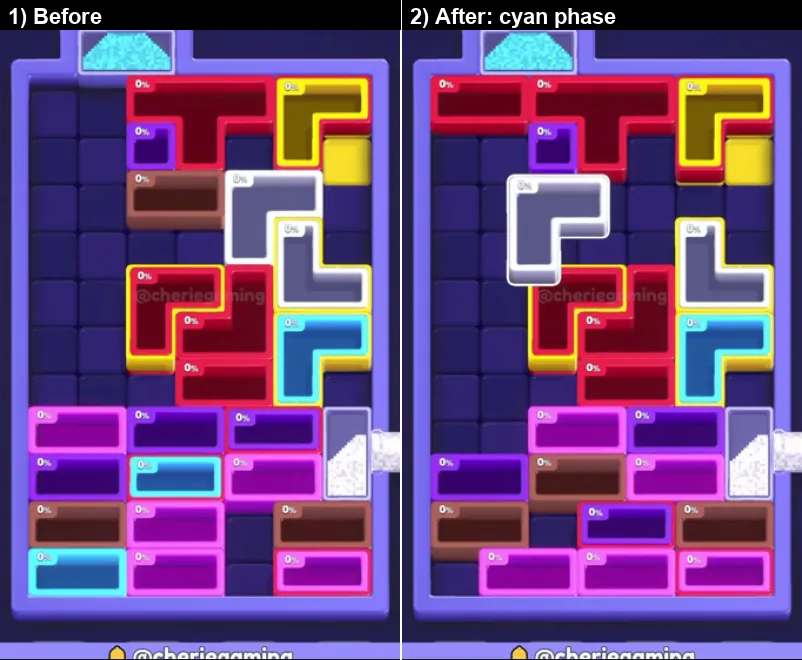
Light blue sand pours down the middle and into the left column. The cyan and purple pits are the ones that grow, a big re-pack lands at 2:30 that wipes the upper half, and the side tube turns red at 2:40.
- What to do: use the top stream for cyan and the side stream for whatever it can reach.
- Why it works: two live colours at once is the highest throughput the board ever offers, and it is the only reason the endgame is reachable.
- Do not: ignore the side tube in this phase. It is about to become the main stream.
Step 9 - Red from the side (2:40-3:06)
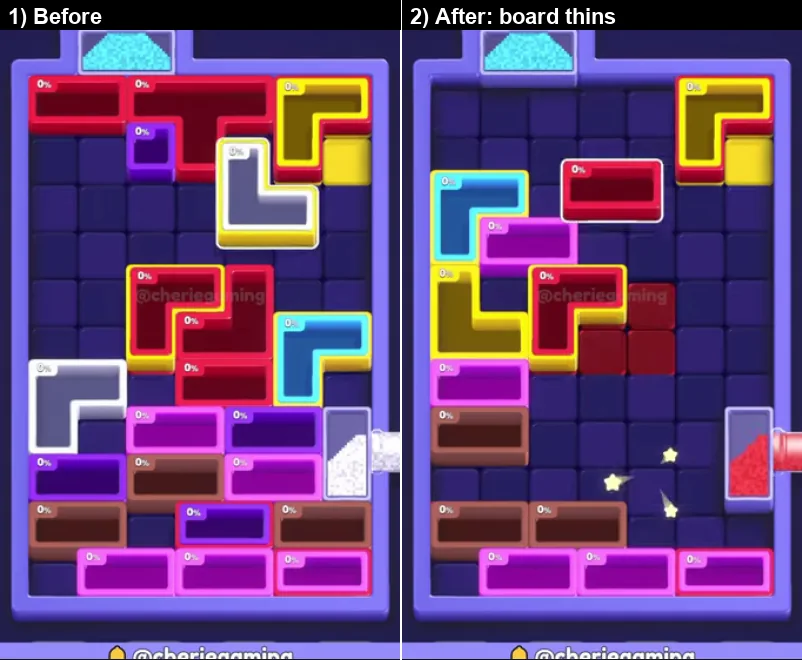
The red side stream now feeds the right-hand pits while cyan keeps coming from the top. Pits clear in clusters at 2:44 and 3:00, the purple and magenta set is wiped, and the middle glass pane sits empty without needing attention.
- What to do: split the board: right-edge pits to the red stream, centre pits to the top stream.
- Why it works: with cyan on top and red on the side the board halves in twenty seconds, which is exactly what a three-second finish needs.
- Do not: drag a red pit to the middle of the board for a better angle. The side stream already reaches it.
Step 10 - Magenta, then yellow (3:06-3:23)
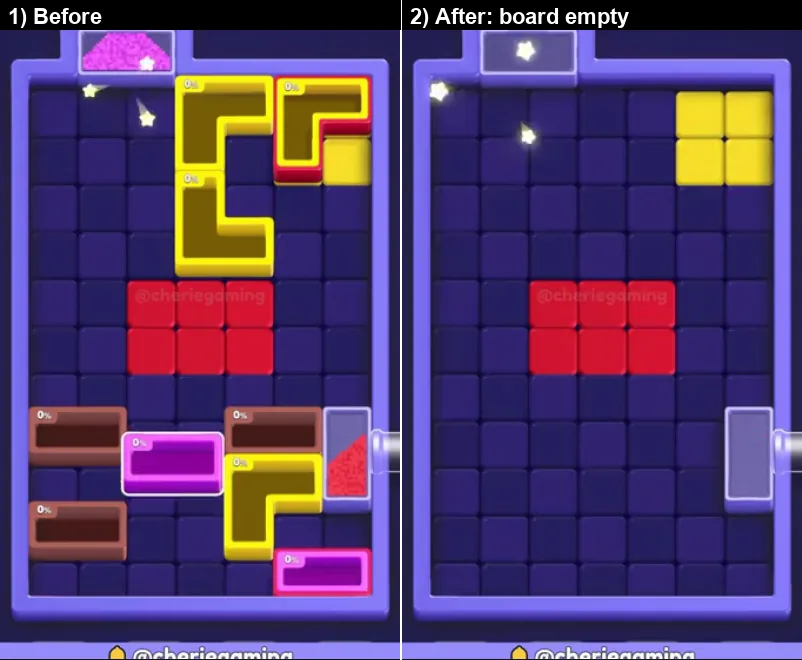
The top tube turns magenta at about 3:02 and then yellow at about 3:16, running dry at 3:19. The side tube stops at about 3:06. The last yellow 2x2 block and red 2x2 block clear at 3:23 with three seconds on the clock, and the rewards card lists Rewards 40.
- What to do: keep both 2x2 blocks alive until the yellow stream reaches them, and use the last red seconds on the red one.
- Why it works: a three-second tail is enough when the last two blocks are already parked and only need a colour match.
- Do not: clear one 2x2 early with the wrong colour. It will not come back.
What each colour is doing
| Colour | Role on Level 490 |
|---|---|
| Green | The side tube's opening colour, 0:04 to 0:20. It stretches the right-hand magenta pit and spends the green pane badge. |
| Orange | The top tube from 0:04 to 2:01, the longest phase. It fills the red T pits and then grinds. |
| Light blue | The top tube from 2:02 to 3:01. It takes the middle and left columns and triggers the 2:08 and 2:30 re-packs. |
| Red | The side tube from 2:40 to 3:06. With cyan on top it halves the board in twenty seconds. |
| Magenta | The top tube from 3:02 to 3:13. The clean-up colour for the last purple pits. |
| Yellow | The top tube from 3:16 to 3:19. A three-second tail that finishes the final 2x2 blocks. |
| Green pane 4 and blue pane 3 | Board covers that deliver sand for free and burst at 0:23 and 0:57. |
Three rules that carry the level
- Panes first. Both covers deliver sand for free and each burst re-packs the board. Finish every pit you can while a pane is still up.
- One stream, one pit. Only the pit under a stream grows. The middle of this level is a parking problem, not a filling problem.
- Re-read the board whenever a tube changes colour. Orange, light blue, magenta, yellow: each switch invalidates half the board, and the last switch is what finished this run with three seconds left.
Common mistakes on level 490
- Working the covered board. Until 0:23 and 0:57 the upper half is behind glass.
- Ignoring a pane burst. The mosaic slides a full pane height; old positions are wrong positions.
- Letting the orange grind run without a target. Half a minute of a single stream is lost if the tallest pit is not under it.
- Staying on a colour after the tube changed. Orange pits cannot be finished after 2:02.
- Clearing a 2x2 block with the wrong stream. The tail only has three seconds and two colours.
Quick reference
Green side sand -> green pane 4 to 0 and bursts at 0:23 -> red T fills under orange -> blue pane bursts at 0:57 -> orange-only grind -> four re-packs at 1:28 to 1:42 -> orange clears, tube turns light blue at 2:02 -> cyan phase and a big re-pack at 2:30 -> red side tube at 2:40 -> magenta then yellow tail -> last 2x2 blocks clear at 3:23 with three seconds left.
The full video is embedded at the top of this page, and the timestamps above refer to that recording.
Where Level 490 sits in Sand Blocks
Level 490 is the 241st of 451 Expert boards in Sand Blocks: Drop Puzzle, and about 70% of the way through the 700 levels this guide currently covers.
Expert boards run from Level 250 to Level 700, and this page covers the 241st of them, in the later half of the tier.
It sits between Level 489 and Level 491, inside the 481-520 block of the level index.
The walkthrough above runs 3:33 and shows the clear start to finish.
More expert walkthroughs
View all →
Sand Blocks Level 490 FAQ
How do I beat Sand Blocks Level 490?
Follow the step-by-step walkthrough below. It splits the clear into ten key moments, shows the lock counts before and after each move, and gives the full green-to-red order for the 3:00 timer.
What difficulty is Level 490 in Sand Blocks?
Level 490 is rated Expert difficulty in Sand Blocks: Drop Puzzle — the 241st of 451 boards in that tier, and level 490 of 700 overall.
Is there a video walkthrough for Sand Blocks Level 490?
Yes — this page includes the full 3:33 video walkthrough, plus the written pull-order steps beneath it. You can also watch it directly on YouTube.
Featured walkthroughs
The levels players search for most - each with a full video guide.