Sand Blocks Level 457 Walkthrough & Answers
ExpertLevel 457 video solution · 3:42 · 1.8K views · published September 2026
Watch on YouTube →- Difficulty
- Expert
- In its tier
- 208 of 451
- Through the game
- 65%
- Walkthrough
- 3:42
- Views
- 1.8K
Need the Sand Blocks Level 457 solution without guessing? It is an Expert board that lands 65% into the 700-level run. One careful watch plus the numbered steps is usually enough to clear it on your own board.
Level board
How to clear Sand Blocks Level 457
A frame-by-frame guide to Sand Blocks level 457: a brown 4 pane and a red 3 pane seal the board, each counts only its own colour, and the last violet block finishes with six seconds left.
Step-by-step walkthrough

Prefer screenshots to video? Every key moment of the clear is below in order, with a before/after frame and the lock counts either side of the move. Keep it open next to the game and follow along.
Level 457 opens sealed. Two glass panes hang over the board with numbers on them - a red 3 across the top half and a brown 4 across the bottom - and the only playable ground is a ten-pit strip along the bottom edge, every pit at 0%. Three mouths feed the strip: a tray on the top edge (cyan), a bin on the left edge (red) and a tube on the right edge (dark gold).
The rule that decides the whole first minute is easy to get wrong: each pane counts only its own colour. Brown pits finishing in the strip drag the brown 4 down (4 to 3 at 0:06.5, 3 to 2 at 0:17, 2 to 1 at 0:19) and shatter it at 0:24.5, releasing about twenty new pits. The red 3 ignores all of them and only starts moving when red pits complete, melting at 0:47. That half-minute gap is why the board seems to open in two waves and why the first sixty seconds are the cheapest progress in the level.
After 0:48 the board is a thirty-pit mosaic of 0% shapes and the rest of the run is pure colour matching against three mouths that keep changing paint. The clear lands at 3:30.5 with about six seconds of margin.
Level 457 at a glance
| Detail | Level 457 |
|---|---|
| Difficulty | Expert |
| Timer | 3:36 |
| Colours on the board | Red, brown, cyan, magenta, green, gold, blue, white, violet |
| Sealed panes | Red 3 (upper), brown 4 (lower) - each counts its own colour |
| Feeds | Top tray, left bin, right tube |
| Top tray order | Cyan, green at 2:53, white at 3:15 |
| Left bin order | Red until 2:38, then magenta |
| Right tube order | Dark gold, bright yellow at 3:03, spent by 3:17 |
| Clear time | 3:30.5 |
| Time left at the clear | About 6 seconds |
| Source run | The video solution above |
The ten-step route
| # | Time | What happens | Where it happens |
|---|---|---|---|
| 1 | 0:04-0:07 | Two panes seal the board; a brown pit on the right edge fills and the brown lock goes 4 to 3 | Bottom strip and brown pane |
| 2 | 0:12-0:19 | Brown locks runs 3 to 2 at 0:17 and 2 to 1 at 0:19 while strip pits finish | Bottom strip |
| 3 | 0:22-0:25 | The brown pane shatters at 0:24.5 and about twenty pits open | Lower half |
| 4 | 0:36-0:49 | Red pane 3 to 2, 2 to 1, then melts 0:47-0:48; the board doubles to about thirty pits | Upper half |
| 5 | 0:49-1:10 | Cyan from the top tray; a pit parked under the outlet hits 100% at 1:10 | Top outlet and centre |
| 6 | 1:10-1:47 | Long re-parking window; a second cyan pit under the outlet finishes at 1:46.5 | Top outlet |
| 7 | 1:47-2:04 | Tray runs low; a fresh 2-cell pit fills 0 to 100% at 2:04 in under two seconds | Top outlet, right half |
| 8 | 2:04-2:38 | The red L climbs 42, 65, 100 percent and clears at 2:37; the left bin turns magenta at 2:38 | Left edge |
| 9 | 2:38-3:07 | Magenta clears two pits at 2:56 and 2:58; top turns green at 2:53; brown 3:01; right bin gold, gold pit 3:07 | Left, top and right |
| 10 | 3:07-3:30 | Blue 2x2 at 3:11, white from 3:15, yellow 3:16 and 3:19, violet bars 3:25 and 3:28; last block fades 3:30.5 | Whole board |
Step 1 - Two panes, one live strip (0:04-0:07)
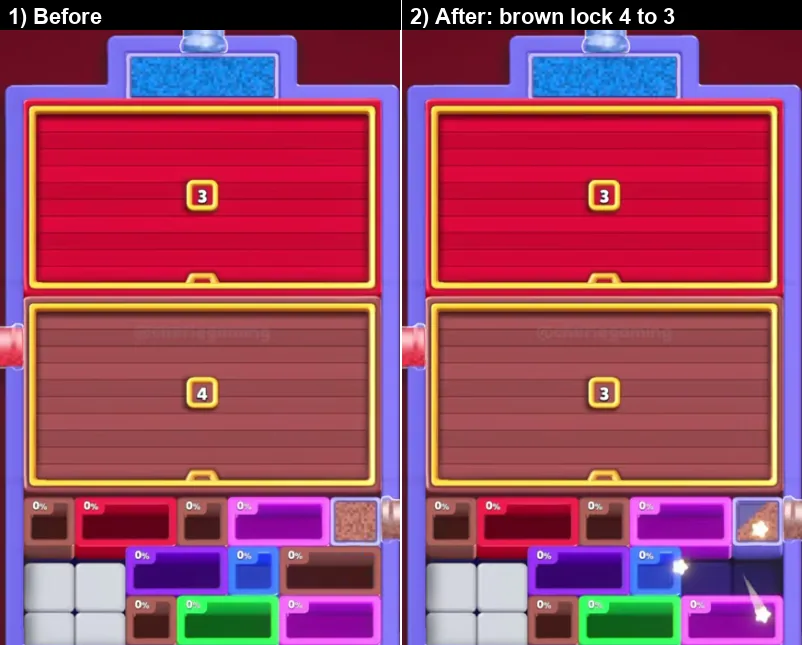
The opening board is almost entirely glass: a red 3 pane covers the top half, a brown 4 covers the bottom half, and only the bottom strip of about ten pits can be touched. Red sand pours at the left edge and the right tube feeds a brown pit sitting on the right edge.
- What to do: work the strip only, and prefer brown pits - the brown pane is the first door.
- Why it works: the brown pit reaches 100% at 0:06.5 and takes the brown lock 4 to 3 immediately.
- Do not: drag a pit into the middle of the board. There is no sand there and the pane still blocks it.
Step 2 - The brown lock runs down to 1 (0:12-0:19)
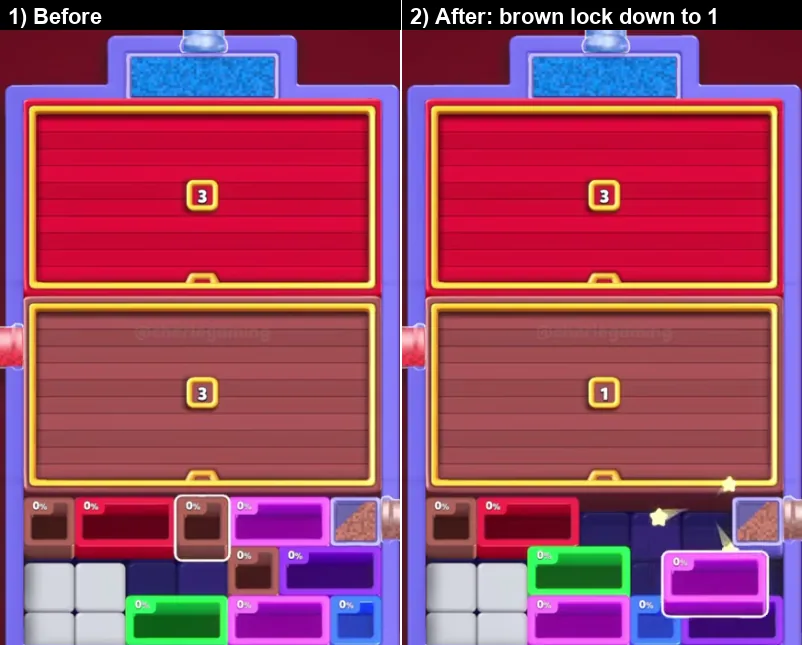
Two further brown completions take the pane 3 to 2 at 0:17 and 2 to 1 at 0:19. The strip rotates under the working player - a brown bar is lifted at 0:13, a green bar shows up at 0:16, a magenta bar is selected at 0:19 - and dark gaps appear where pits have left.
- What to do: keep feeding the smallest brown shape the tube can reach.
- Why it works: the pane is a counter, not an obstacle. Each same-colour completion is worth exactly one digit, so a fast small pit beats a slow large one.
- Do not: assume green or magenta completions help. They move nothing on either pane.
Step 3 - The brown pane shatters (0:22-0:25)
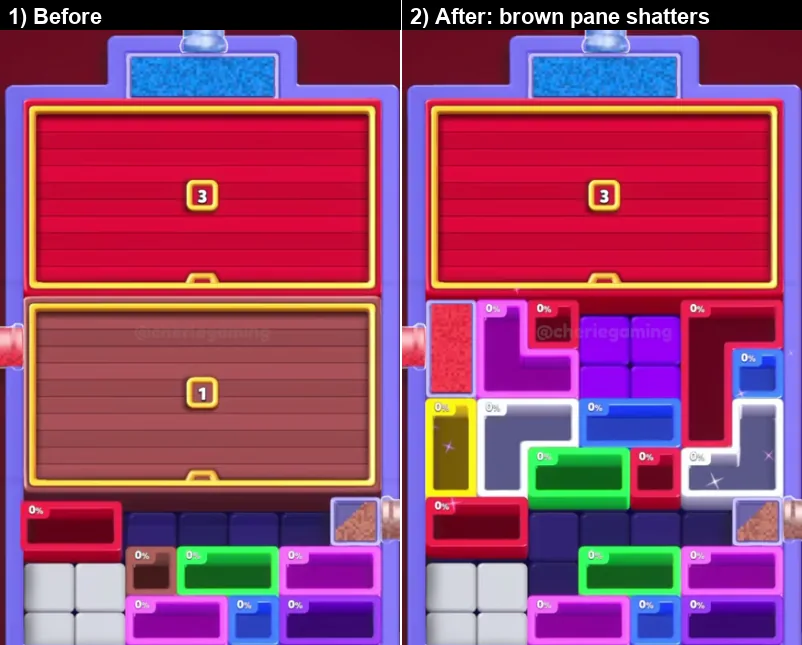
The last brown digit goes at 0:23.4 and the pane shatters at 0:24.5 in a spray of glass fragments. Underneath is not empty board - it is a fresh mosaic of about twenty pits, every one at 0%.
- What to do: stop and read the new layout before touching anything.
- Why it works: the shatter roughly doubles the live board, and every new pit is a new candidate for the streams.
- Do not: carry a pit from the old strip upward on reflex. The strip already re-packed around you.
Step 4 - The red pane melts (0:36-0:49)
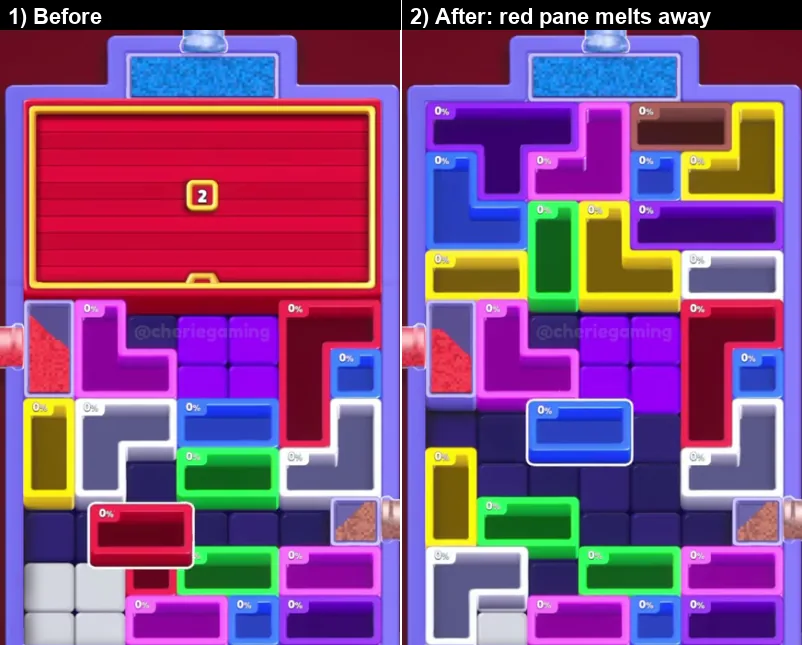
Red now has pits on the board again. A red bar hits 100% at 0:36 and the red lock goes 3 to 2; a second completion takes it to 1 at 0:46, and the pane melts from the bottom up between 0:47 and 0:48. The mosaic doubles a second time to about thirty pits, all at 0%.
- What to do: treat 0:48 as the real start of the level and rebuild your mental map.
- Why it works: both doors are now open, all three mouths are live and nothing is sealed any more.
- Do not: waste the red phase on big shapes. The red pane needed two ordinary completions, not a hero pit.
Step 5 - First cyan pit under the outlet (0:49-1:10)
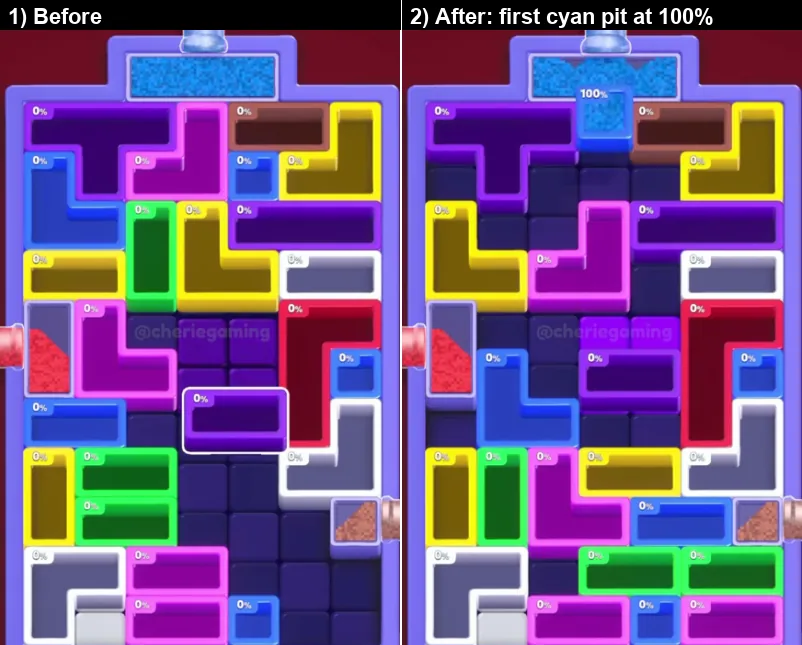
Cyan sand starts coming from the top tray. For twenty seconds pits are dragged around without much filling, then a cyan pit that sits directly under the outlet fills smoothly and reads 100% at 1:10. It vanishes in a star burst and the board re-packs around the hole.
- What to do: park first, fill second. The outlet only feeds the column under it.
- Why it works: cyan is the fastest stream in the level; a pit parked under it finishes in seconds.
- Do not: hold a cyan pit under a stream that is already spent - check the tray pile before you commit.
Step 6 - Second cyan completion (1:10-1:47)
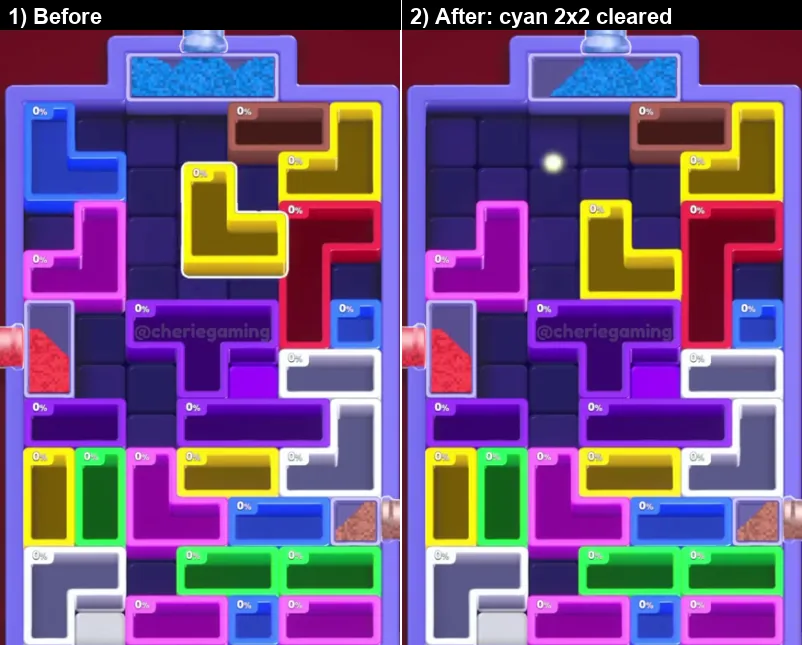
The tray keeps pouring and a second cyan pit finishes at 1:46.5. Almost everything else in this window is dragging: the board is dense, pits are at 0% and the only progress is the pit that happens to sit under the outlet.
- What to do: use the whole window to line up the next cyan shape while the current one fills.
- Why it works: the cyan phase lasts nearly two minutes and pays one pit at a time - queue them.
- Do not: spread cyan across two pits. The stream is narrow; splitting it fills neither.
Step 7 - A fresh 2-cell under the outlet (1:47-2:04)
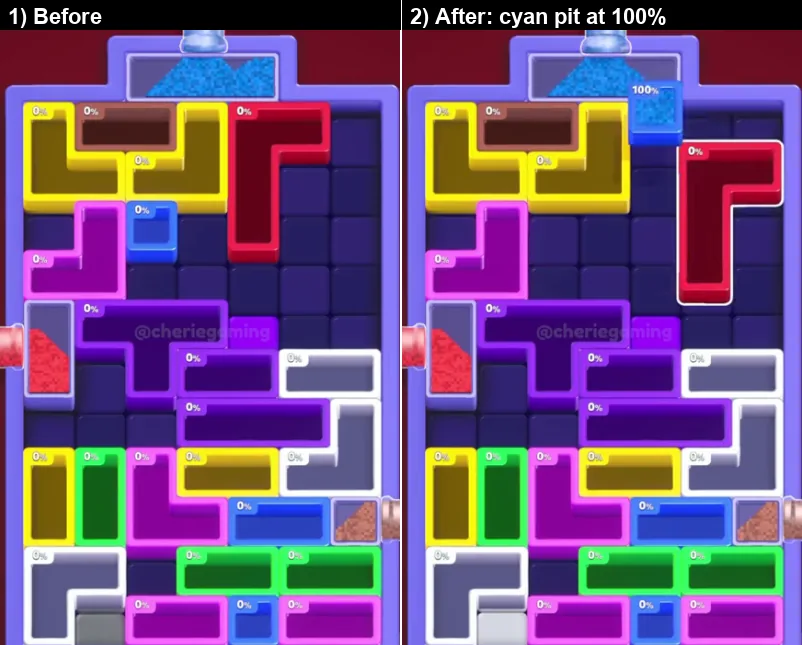
The sand pile in the tray is visibly low, the board re-packs at 2:02, and a fresh small pit appears right under the outlet and goes 0 to 100% in under two seconds, vanishing at 2:05.
- What to do: when the tray runs low, only pick small pits.
- Why it works: a 2-cell needs a couple of seconds of sand; a large shape would starve as the tray empties.
- Do not: start a big cyan bar at 2:00. It cannot finish before the colour changes.
Step 8 - The red L, and a new colour on the left (2:04-2:38)
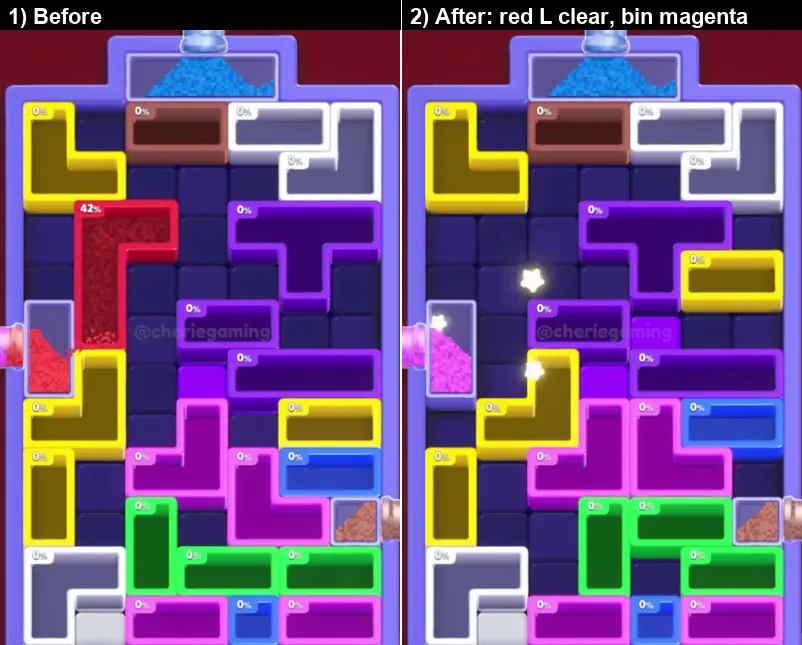
Red comes back from the left bin and the biggest single shape of the level - a red L parked beside it - climbs 42% at 2:28, 65% at 2:34 and 100% at 2:37, then clears in a flash. The left bin switches red to magenta at 2:38.
- What to do: commit to the L early. It needs roughly thirty seconds of a side stream.
- Why it works: a wide pit under a side mouth is the cheapest way to clear a large area on this board.
- Do not: drag the L away at 60% to chase a smaller pit. The percentage stays with the pit, and so does the lost time.
Step 9 - Three mouths, three colours (2:38-3:07)
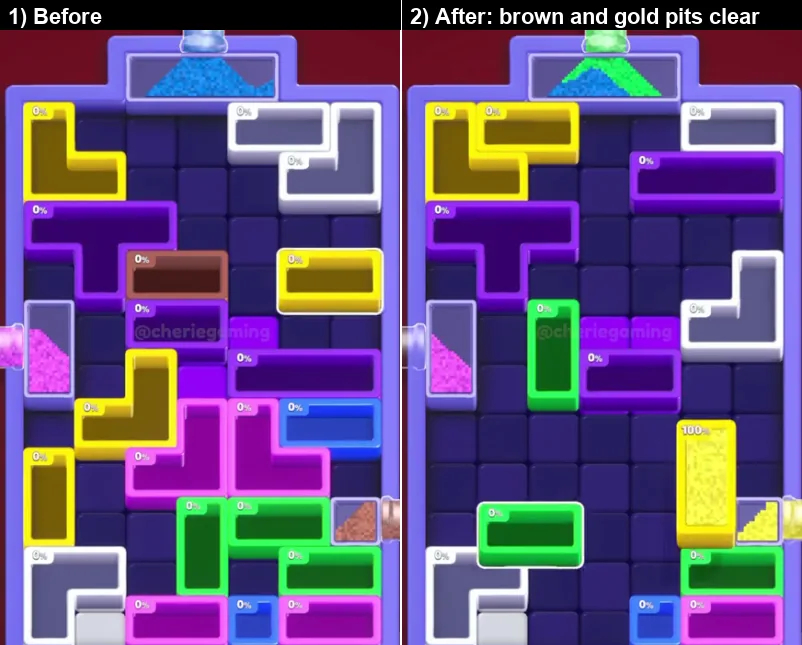
Magenta from the left bin finishes two pits at 2:56 and 2:58. The top stream turns green at 2:53 and takes a green pit. A brown pit clears at 3:01, the right tube turns bright gold and a gold pit hits 100% at 3:07. The board drops to about a dozen shapes.
- What to do: assign each mouth its own side of the board and work them in parallel.
- Why it works: three colours running at once means no waiting - each pit only has to match the mouth beside it.
- Do not: carry a left-mouth colour across the board. Sand only lands under a mouth.
Step 10 - Blue, white, yellow, violet (3:07-3:30)
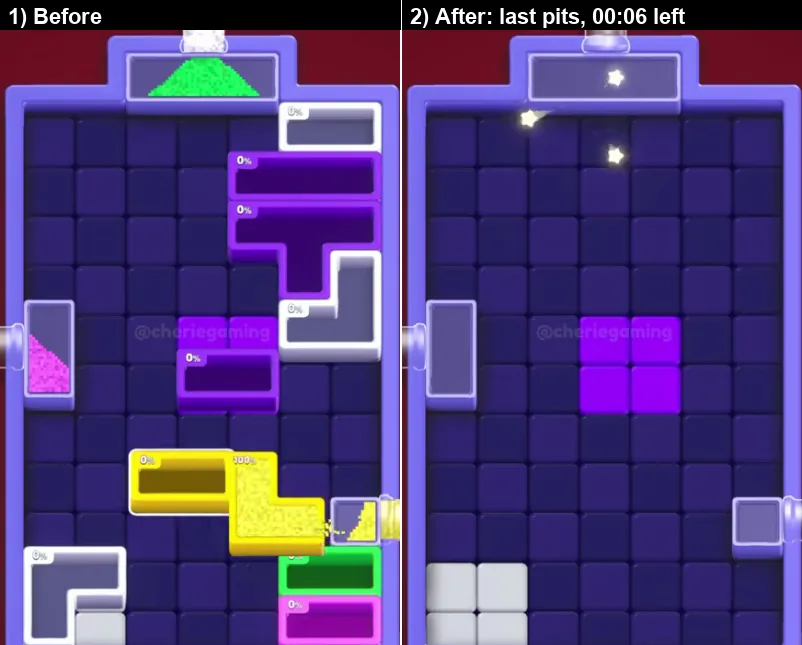
A green pit finishes at 3:10, the blue 2x2 reads 88% at 3:11 and is gone a second later, the top stream turns white at 3:15 and yellow pits finish at 3:16 and 3:19. Two violet bars go at 3:25 and 3:28, and the last violet 2x2 fades at 3:30.5 with six seconds on the clock.
- What to do: keep both the top lane and the right tube reachable in the last half minute.
- Why it works: white arrives from the top and violet from the right; a player who has abandoned one lane loses one of the last colours.
- Do not: leave the bottom-left 2x2 unfilled. It is white, and white has no hue to warn you that it is still there.
What each colour is doing
| Colour | Role on Level 457 |
|---|---|
| Brown | The first door. Brown pits drain the brown 4 pane and shatter it at 0:24.5; a brown pit also clears at 3:01. |
| Red | The second door, and the biggest pit. Red ticks the 3 pane down to its melt at 0:47, then the red L clears at 2:37. |
| Cyan | The workhorse of the middle: three clean completions under the top outlet at 1:10, 1:46.5 and 2:04. |
| Magenta | Left bin from 2:38. Two pits, 2:56 and 2:58. Only useful on left-side shapes. |
| Green | Top tray from 2:53. One pit at 3:10; the tray changes colour without warning. |
| Gold and yellow | Right tube from about 3:00. Gold pit 3:07, yellow pits 3:16 and 3:19. |
| Blue | Board colour with no mouth of its own. The blue 2x2 needs a lane that is still running. |
| White | Top tray from 3:15. Fills the bottom-left 2x2 - read it by what disappears, not by what glows. |
| Violet | Right tube from about 3:19. Two bars and the final block at 3:30.5. |
Three rules that carry the level
- A pane counts its own colour. Brown 4 ticks on brown, red 3 on red. This is why the two panes die half a minute apart and why the strip should be worked colour by colour.
- A shatter means a new board, not less work. Both panes end in a full mosaic of 0% pits at 0:24 and 0:48. Re-read the layout after every burst before dragging.
- Sand only lands where the pit is. The tray, the left bin and the right bin each feed one spot. Every 100% in this run came from a pit that had been parked on purpose.
Common mistakes on level 457
- Working the wrong colour in the strip. A green completion moves neither pane and costs the same seconds as a brown one.
- Chasing big shapes during the cyan phase. The tray pays one pit at a time; small pits are what finish.
- Dragging a pit at 60%. Percentages belong to pits, and a half-filled wide bar rarely comes back.
- Ignoring the left bin after 2:38. Magenta is a new colour on a fresh mouth, not a spent one.
- Forgetting white. White sand has no hue, so an unfilled white 2x2 is easy to miss until the clock is short.
Quick reference
Two panes (red 3, brown 4) seal the board and only the bottom strip is live -> brown pits tick 4 to 3 at 0:06.5 and down to 1 by 0:19 -> the brown pane shatters at 0:24.5 -> red 3 ticks and melts at 0:47-0:48, the board doubles twice -> cyan under the top outlet at 1:10, 1:46.5 and a fresh 2-cell at 2:04 -> red L to 100% at 2:37, left bin turns magenta at 2:38 -> magenta 2:56 and 2:58, top turns green 2:53, brown 3:01, gold 3:07 -> blue 3:11, white 3:15, yellow 3:16 and 3:19, violet 3:25 and 3:28, board empty 3:30.5 with six seconds left.
The full run is embedded at the top of this page, and every timestamp refers to that recording.
Where Level 457 sits in Sand Blocks
Level 457 is the 208th of 451 Expert boards in Sand Blocks: Drop Puzzle, and about 65% of the way through the 700 levels this guide currently covers.
Expert boards run from Level 250 to Level 700, and this page covers the 208th of them, in the earlier half of the tier.
It sits between Level 456 and Level 458, inside the 441-480 block of the level index.
The walkthrough above runs 3:42 and shows the clear start to finish.
More expert walkthroughs
View all →
Sand Blocks Level 457 FAQ
How do I beat Sand Blocks Level 457?
Follow the step-by-step walkthrough below. It splits the clear into ten key moments, shows the lock counts before and after each move, and gives the full green-to-red order for the 3:00 timer.
What difficulty is Level 457 in Sand Blocks?
Level 457 is rated Expert difficulty in Sand Blocks: Drop Puzzle — the 208th of 451 boards in that tier, and level 457 of 700 overall.
Is there a video walkthrough for Sand Blocks Level 457?
Yes — this page includes the full 3:42 video walkthrough, plus the written pull-order steps beneath it. You can also watch it directly on YouTube.
Featured walkthroughs
The levels players search for most - each with a full video guide.