Sand Blocks Level 460 Walkthrough & Answers
ExpertLevel 460 video solution · 3:00 · 1.2K views · published September 2026
Watch on YouTube →- Difficulty
- Expert
- In its tier
- 211 of 451
- Through the game
- 66%
- Walkthrough
- 3:00
- Views
- 1.2K
Need the Sand Blocks Level 460 solution without guessing? It is board 460 out of 700, rated Expert (211th of 451 in that tier). The video above is a real 3:00 clear; the steps below break down the order it uses so you can repeat it.
Level board
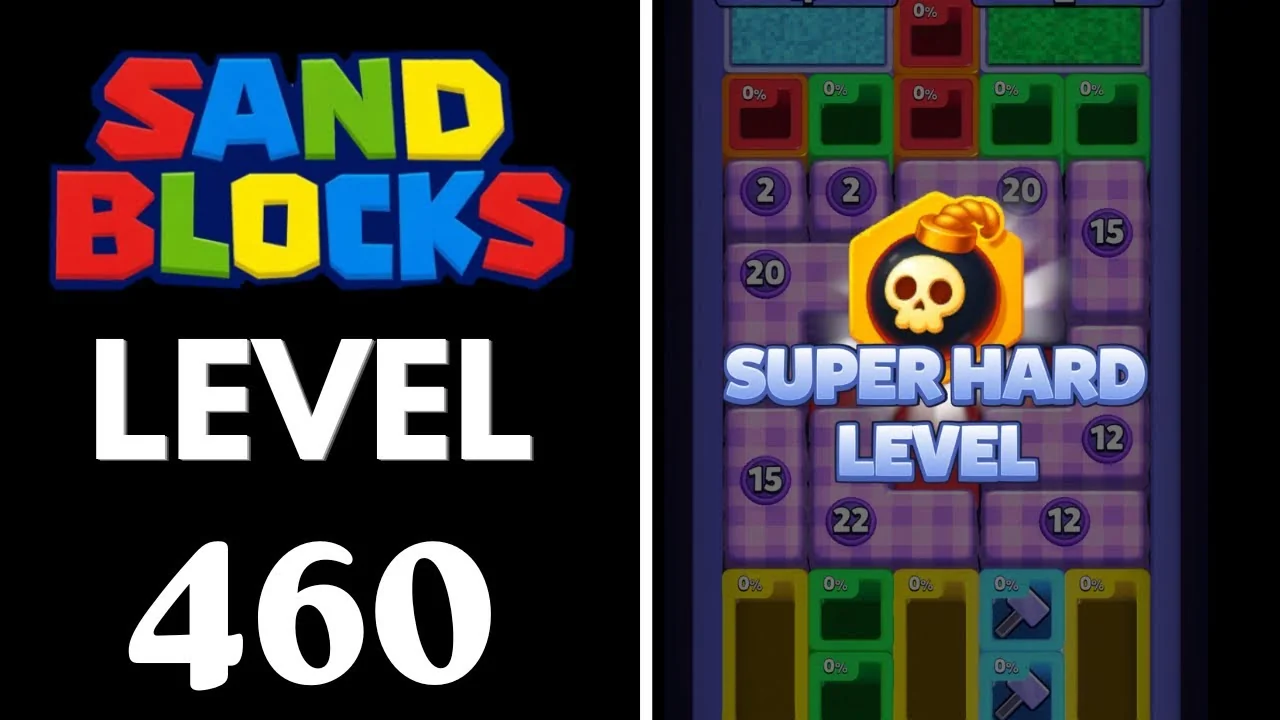
How to clear Sand Blocks Level 460
A frame-by-frame guide to Sand Blocks level 460: pink checkered pits carry purple badges in the twenties, two top lanes tick 4 and 2, and the board empties with seven seconds left.
Step-by-step walkthrough

Prefer screenshots to video? Every key moment of the clear is below in order, with a before/after frame and the lock counts either side of the move. Keep it open next to the game and follow along.
Level 460 is a badge-board level. The whole playing area is a packed mosaic of pink checkered pits, and every one of them carries a round purple badge with a number in it. One pit reaching 100 percent knocks exactly one off every badge on the board, and any badge that lands on 0 disappears together with its pit. That turns a board that looks impossible into a board that can be deleted four pits at a time.
Above the mosaic sit two glass lanes with gold counters: 4 on the left and 2 on the right. They tick down as the board is cleared and they re-fill the top rows with sand. Clearing this one takes until 2:40 on a 2:47 clock, so it is a seven-second finish rather than a comfortable one, and the lane drops are what decide whether you get there.
Each pair of frames below is a before/after from the run in the video above. Left is the board before the change, right is the same board afterwards. Watch the badge numbers in both halves: a single completion usually moves every number on screen.
Level 460 at a glance
| Detail | Level 460 |
|---|---|
| Difficulty | Expert |
| Timer | 2:47 |
| Colours on the board | Pink checkered pits, red, cyan, yellow, green, brown, purple |
| Badges at the start | 20, 20, 15, 15, 22, 12 |
| Lane counters | Left 4, right 2 |
| Lane drops | 0:32 (4 to 3, 2 to 1) and 0:46 (3 to 2) |
| Clear time | 2:40 |
| Time left at the clear | About 7 seconds |
| Source run | The video solution above |
The rule that matters is board-wide: a completion is a discount on every pit you own, not a single step forward. Badges in the high teens are scenery. Badges at 1 or 2 are pits that will delete themselves the next time anything finishes, which is why the endgame of this level is so fast compared with its opening.
The ten-step route
| # | Time | What happens | Where it happens |
|---|---|---|---|
| 1 | 0:04-0:12 | The opening 100 percent rows clear and every badge ticks down | Whole board |
| 2 | 0:12-0:28 | The big red block breaks up and disappears | Centre |
| 3 | 0:28-0:40 | Lane counters drop: left 4 to 3, right 2 to 1 at 0:32 | Top lanes |
| 4 | 0:40-0:50 | Left counter 3 to 2 at 0:46 and the red-pink set is wiped | Centre to right |
| 5 | 0:50-1:04 | The right red lane hits 100 percent at 1:00 | Top-right lane |
| 6 | 1:04-1:26 | Positioning phase: yellow bars dragged and swapped | Left and bottom |
| 7 | 1:26-1:36 | A red pit runs 73 percent and clears at 1:32 | Upper left |
| 8 | 1:36-2:08 | A pink pit with badge 3 appears at 1:46 and is dragged | Right to centre |
| 9 | 2:08-2:30 | The yellow frame clears at 2:18 and the brown set at 2:30 | Bottom and centre |
| 10 | 2:30-2:40 | Pink pits gone by 2:38, purple L at 100 percent at 2:39 | Centre |
Step 1 - The opening rows clear (0:04-0:12)
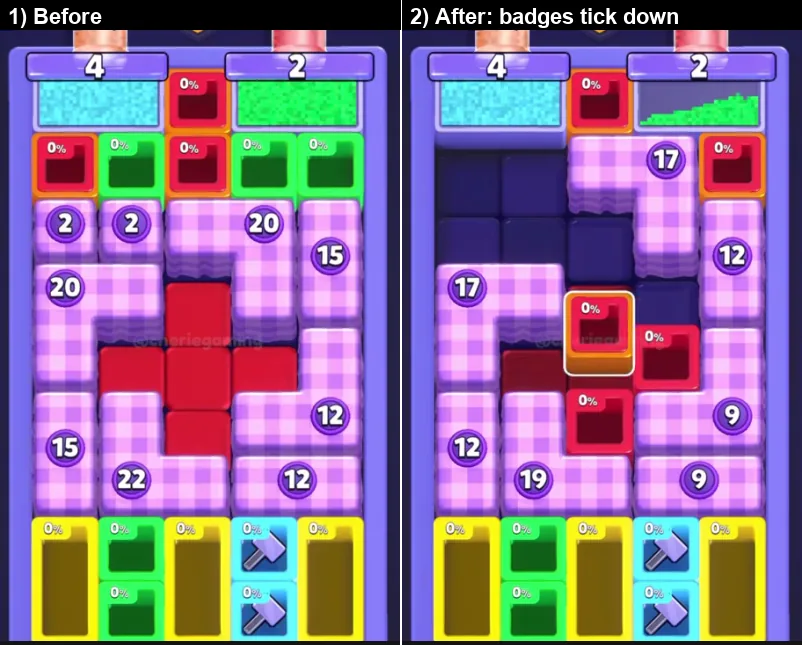
The level opens with two full top lanes reading 4 and 2, and a packed pink board whose badges sit in the high teens and twenties. The rows that start at 100 percent clear immediately and the whole badge wall falls: 20, 20, 15, 15, 22, 12 become 17, 17, 12, 12.
- What to do: let the opening rows clear before touching the board, then read every badge you can see.
- Why it works: completions are free here, and each one discounts the entire board at once.
- Do not: drag a pit during the opening second. Nothing you move can beat a free completion.
Step 2 - The red block breaks up (0:12-0:28)
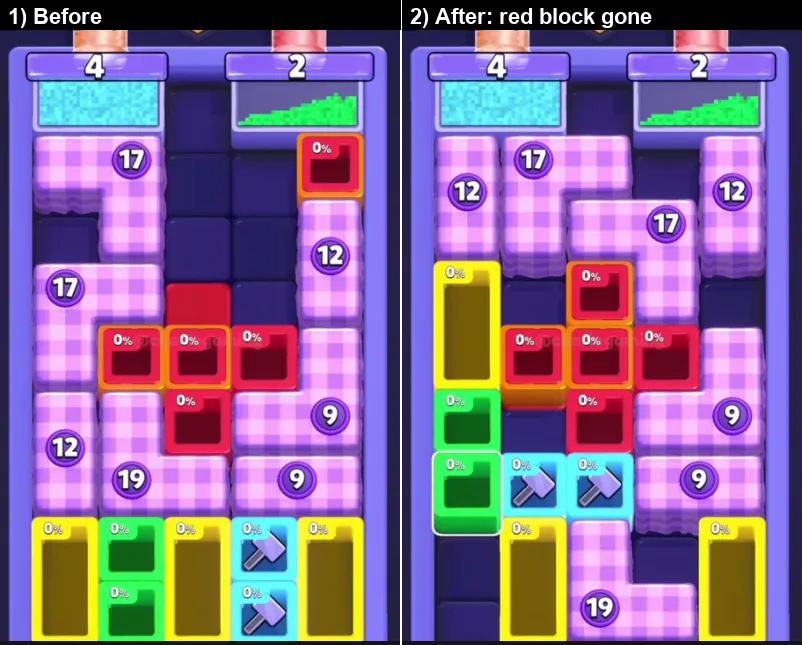
The big red block in the centre is filled, split and cleared piece by piece, and the bottom-left yellow bar goes with it at about 0:24. Badges fall again, from 17 to 12.
- What to do: keep the stream on the red block and let it come apart in place.
- Why it works: a multi-cell block that splits produces several completions from one stream, and each completion is another board-wide discount.
- Do not: pull the stream away to rescue a corner pit. The block is worth more than any single pit.
Step 3 - Lane counters drop (0:28-0:40)
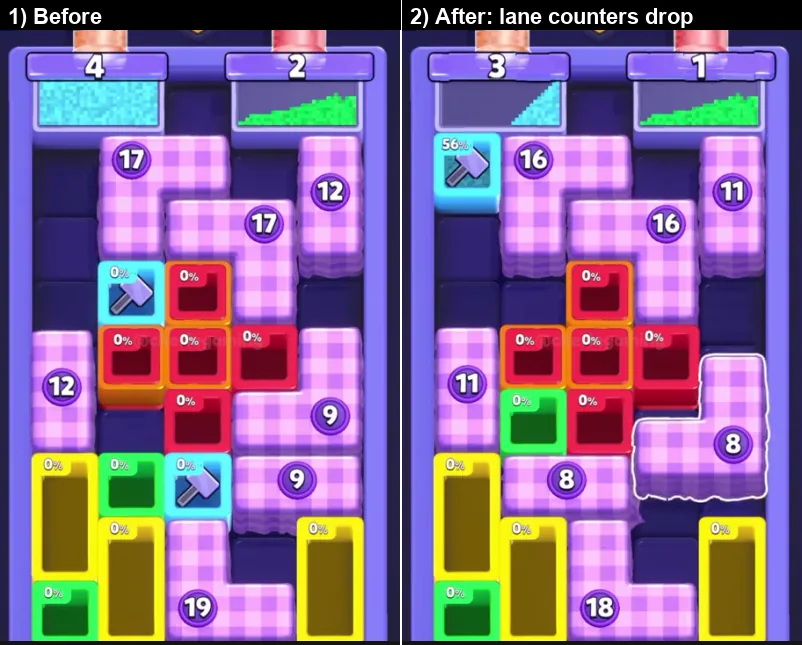
At about 0:32 the left lane counter goes from 4 to 3 and the right counter from 2 to 1, and the board re-packs. A cyan arrow pit at 56 percent appears at the upper left, and the bottom yellow bar swaps places with a cyan pit.
- What to do: treat the lane drop as a scheduled re-pack and re-read the layout immediately afterwards.
- Why it works: the lanes are the outer clock of this level. Every drop rewrites the board, and the pit you were nursing may no longer exist.
- Do not: count on a pit surviving the drop. Nothing on this board is fixed except the yellow L anchor.
Step 4 - Left counter 3 to 2, red-pink wiped (0:40-0:50)
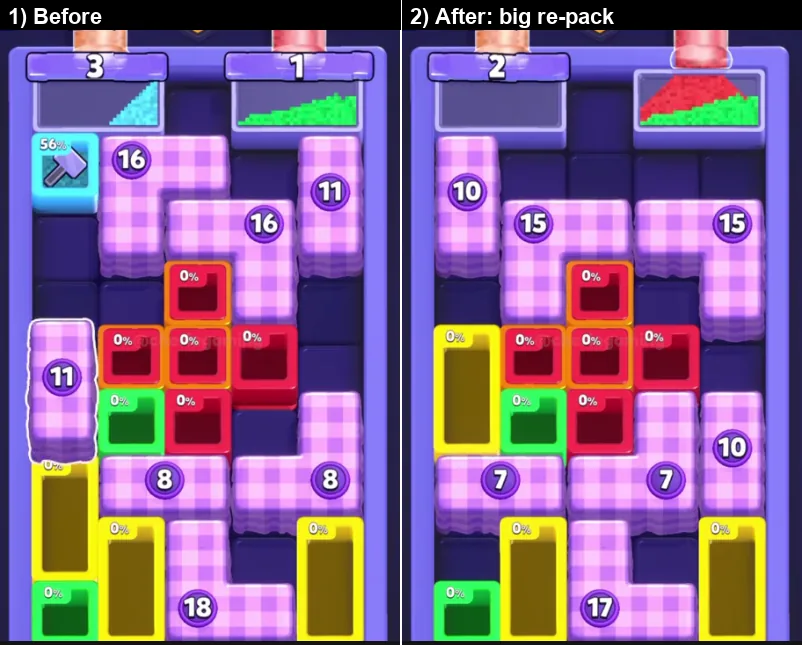
The left lane counter drops from 3 to 2 at 0:46. Between 0:46 and 0:50 a full re-pack lands, the red and pink sets are wiped, and the right lane switches from green to red sand.
- What to do: finish whatever sits at 90 percent in the ten seconds before 0:46, because the wipe will take it.
- Why it works: the second lane drop is the phase change of the level; everything before it is bookkeeping and everything after it is dragging.
- Do not: hold a partially filled pit through the wipe and expect the progress to stay.
Step 5 - The right red lane hits 100 (0:50-1:04)
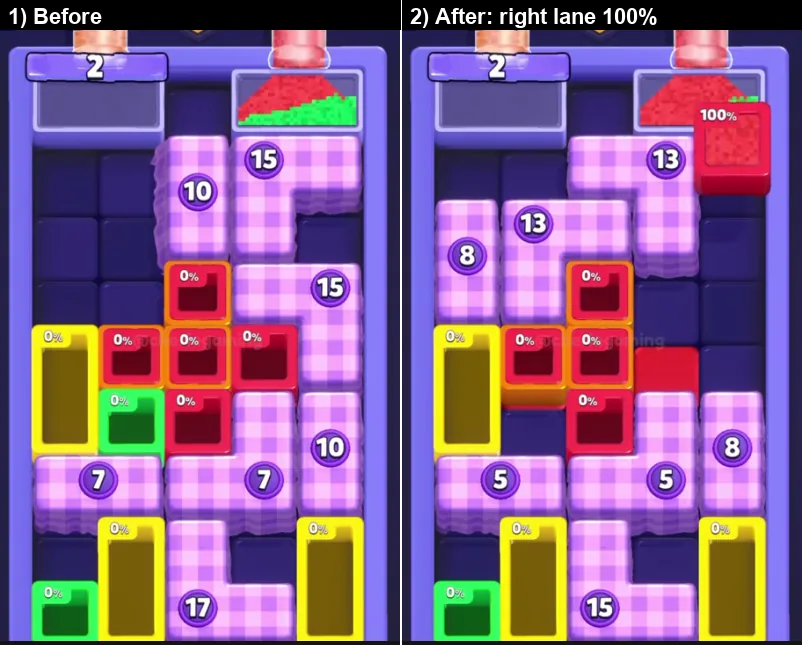
The right-hand lane fills with red sand and reads 100 percent at 1:00. The badges drop twice inside the same ten seconds, from 15, 13, 9, 8 down to 12 and 7, and the red bar is spent.
- What to do: park a wide pit under the right lane and leave it there until the lane is empty.
- Why it works: a lane that reads 100 percent pays two badge ticks at once, which is the single best moment of the first minute.
- Do not: pull the lane before it hits 100. Partial lane fills are wasted sand.
Step 6 - Positioning phase (1:04-1:26)
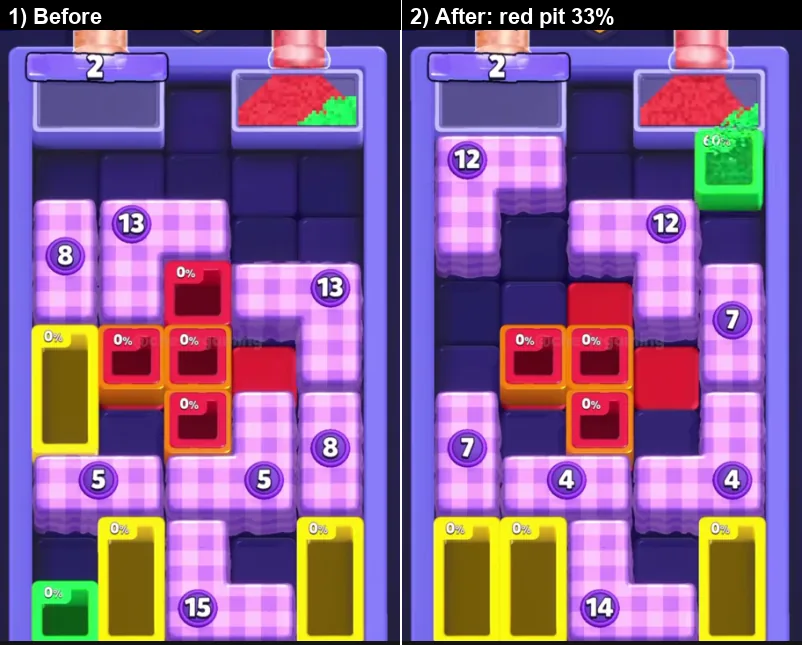
For more than twenty seconds nothing scores: the yellow vertical bars along the bottom and left are dragged and swapped, green 0 percent pits appear, and a red pit at the upper left reaches 33 percent. Badges slide from 12 to 11 on a single completion.
- What to do: park every badge-1 and badge-2 pit under a live stream during this window.
- Why it works: the cheap phase only exists if the cheap pits are in position when it starts. Otherwise you spend the endgame dragging instead of finishing.
- Do not: read this stretch as a stall. It is the most important positioning window of the level.
Step 7 - The red pit clears (1:26-1:36)
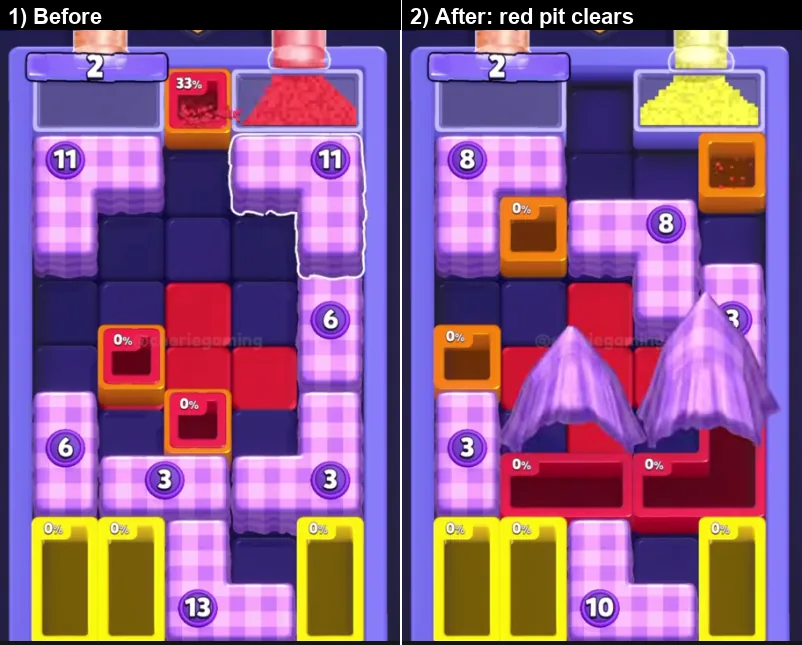
The upper-left red pit runs to 73 percent at 1:30 and clears at 1:32. Badges fall from 11, 6, 3 to 9, 4, 1, and the smallest pits vanish with them. The top sand turns yellow at about 1:36.
- What to do: chase the completion that takes the most badges with it, which on this board is always the one that deletes the 1s.
- Why it works: a fall from 3 to 1 means every badge-1 pit is now one completion away from deleting itself.
- Do not: spread sand across three pits instead of finishing one.
Step 8 - The pink 3 pit (1:36-2:08)
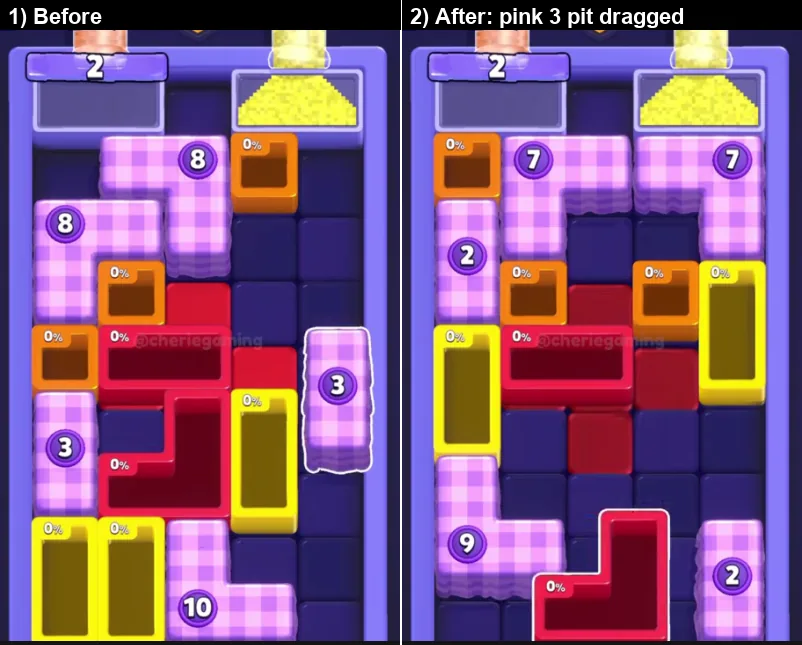
A pink pit carrying badge 3 appears on the right at 1:46 and is dragged around the board while re-packs land repeatedly. The red block grows back at 2:08 and the layout is redrawn again.
- What to do: drag the badge-3 pit toward a live stream instead of toward the middle of the board.
- Why it works: the badge number tells you how many more completions that pit will survive, and a 3 is worth moving early.
- Do not: spend the whole window on one pit. Three or four drags is enough; after that the fills matter more.
Step 9 - Yellow frame and brown set (2:08-2:30)
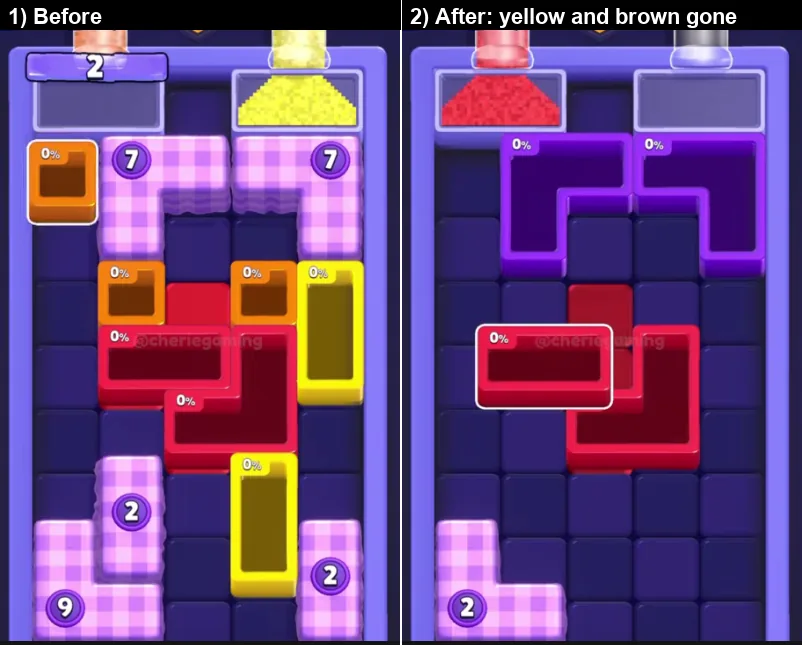
The yellow frame on the bottom-left clears at 2:18 and the brown set clears at 2:30, with a large re-pack landing at the same moment. Purple pits reappear in the space that opens.
- What to do: point the top tube at the frame and keep the green lane working the brown set.
- Why it works: frames need a steady stream rather than a drag, so this is one of the few places on the level where leaving a pit alone is correct.
- Do not: interrupt the frame to answer a new purple pit. The new pits are the endgame, and they will still be there in twenty seconds.
Step 10 - Pink, then purple (2:30-2:40)
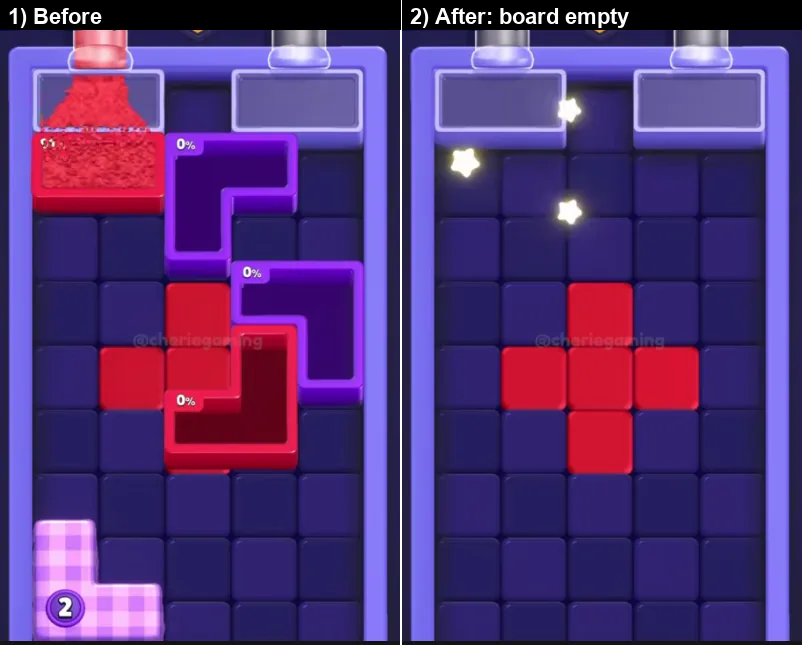
The pink pits all clear by about 2:38 and the board is left with a purple L at 17 percent and one red cross. The purple L reaches 100 percent at 2:39, the board empties at 2:40 with seven seconds on the clock, and the rewards card lists Rewards 40 and x2 Coins 80.
- What to do: finish the purple L in place and do not open anything new.
- Why it works: the last pit is always the one that has been under a stream longest. At seven seconds on the clock, nothing else is affordable.
- Do not: restart a colour you have already cleared. On this board a restarted pit costs more than it pays.
What each colour is doing
| Colour | Role on Level 460 |
|---|---|
| Pink checkered | The body of the board and the scoreboard, not a target. Read its badges before moving anything. |
| Red | The centre block and the right lane. It clears the centre twice, at 0:12 to 0:24 and at 0:46 to 0:50. |
| Green | The right lane from 0:04 to 0:46. It fills the first lane and hands over to red, which is the phase change. |
| Yellow | Tube and lane later, plus the bottom-left frame that clears at 2:18. |
| Brown | The set that clears at 2:30 and opens the endgame. |
| Purple badges | Not sand: the discount system. Each completion knocks one off every badge. |
| Lane counters 4 and 2 | The outer clock. They drop at 0:32 and 0:46 and re-pack the board each time. |
Three rules that carry the level
- A completion is a board-wide discount. Every 100 percent pit knocks one off every badge, and once the badges reach single digits a single clear can delete four pits.
- The lane counters set the pace. The top lanes tick at 0:32 and 0:46 and rewrite the board. Plan around those two moments, not around the timer.
- Positioning phases are not wasted time. Between 1:04 and 1:26 nothing scores, but every badge-1 and badge-2 pit has to be parked in that window or the cheap phase is lost.
Common mistakes on level 460
- Reading badges as difficulty instead of as a countdown. The number is how many more completions that pit survives.
- Fighting a lane drop. Whatever is half full at 0:46 is gone; finish it before then or ignore it.
- Spreading sand across the board. One completion that deletes four pits is worth more than four pits at 60 percent.
- Skipping the 1:04 to 1:26 positioning window. It is the only chance to park the cheap pits.
- Opening new pits in the last ten seconds. The purple L and the red cross are the finish; anything else is a distraction.
Quick reference
Opening rows clear and the badges drop to 17/17/12/12 -> red block breaks up -> lane counters 4 to 3 and 2 to 1 at 0:32 -> left counter 3 to 2 at 0:46 with a full re-pack -> right red lane hits 100 at 1:00 -> dragging phase -> red pit clears at 1:32 -> pink 3 pit at 1:46 -> yellow frame at 2:18, brown set at 2:30 -> pink and purple finish at 2:40 with seven seconds left.
The full video is embedded at the top of this page, and every timestamp above refers to that recording.
Where Level 460 sits in Sand Blocks
Level 460 is the 211th of 451 Expert boards in Sand Blocks: Drop Puzzle, and about 66% of the way through the 700 levels this guide currently covers.
Expert boards run from Level 250 to Level 700, and this page covers the 211th of them, in the earlier half of the tier.
It sits between Level 459 and Level 461, inside the 441-480 block of the level index.
The walkthrough above runs 3:00 and shows the clear start to finish.
More expert walkthroughs
View all →
Sand Blocks Level 460 FAQ
How do I beat Sand Blocks Level 460?
Follow the step-by-step walkthrough below. It splits the clear into ten key moments, shows the lock counts before and after each move, and gives the full green-to-red order for the 3:00 timer.
What difficulty is Level 460 in Sand Blocks?
Level 460 is rated Expert difficulty in Sand Blocks: Drop Puzzle — the 211th of 451 boards in that tier, and level 460 of 700 overall.
Is there a video walkthrough for Sand Blocks Level 460?
Yes — this page includes the full 3:00 video walkthrough, plus the written pull-order steps beneath it. You can also watch it directly on YouTube.
Featured walkthroughs
The levels players search for most - each with a full video guide.