Sand Blocks Level 458 Walkthrough & Answers
ExpertLevel 458 video solution · 3:29 · 2.2K views · published September 2026
Watch on YouTube →- Difficulty
- Expert
- In its tier
- 209 of 451
- Through the game
- 65%
- Walkthrough
- 3:29
- Views
- 2.2K
If Sand Blocks Level 458 keeps resetting on you, watch one correct run first. It is an Expert board — the 209th of 451 in that tier, about 65% of the way through the game. Watch the run above once, then pull in the same order — the numbered steps below spell it out.
Level board
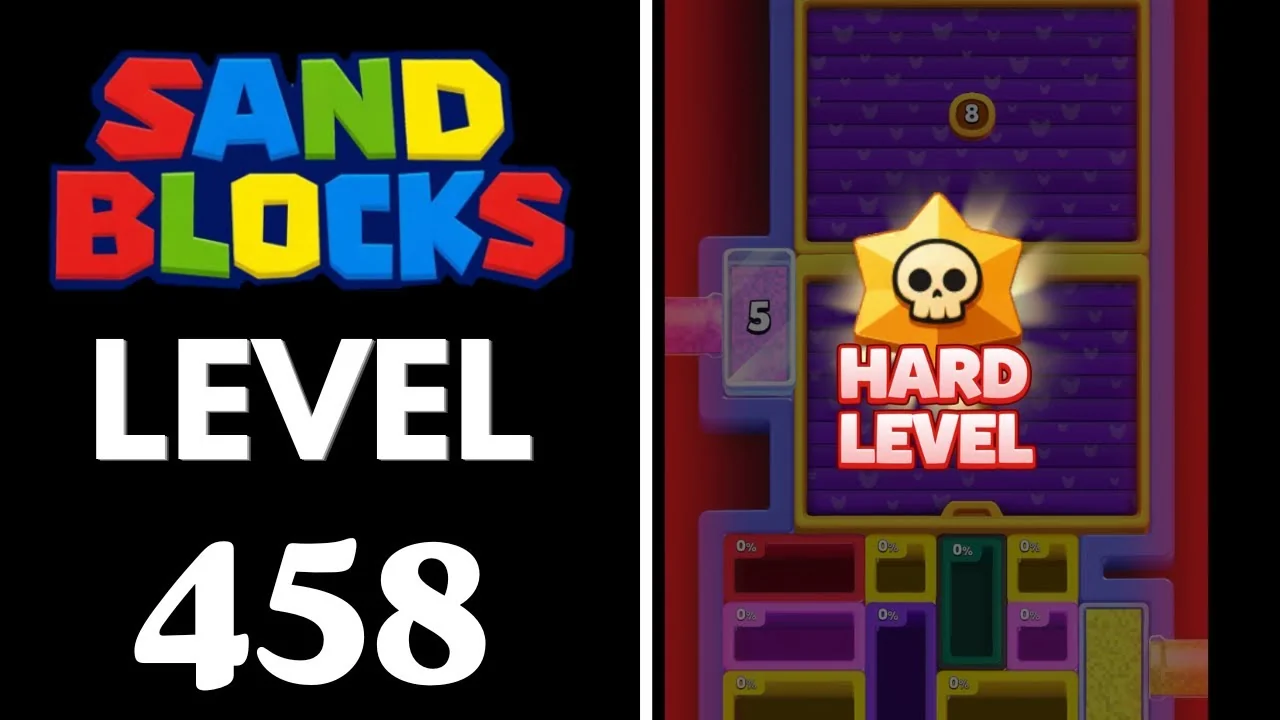
How to clear Sand Blocks Level 458
A frame-by-frame guide to Sand Blocks level 458: a top pane at 8, a lower pane at 4 and a side gauge at 5 all tick down together, then the colour work finishes the Expert board with about 30 seconds left.
Step-by-step walkthrough

Prefer screenshots to video? Every key moment of the clear is below in order, with a before/after frame and the lock counts either side of the move. Keep it open next to the game and follow along.
Level 458 does not open with a colour puzzle, it opens with a bookkeeping puzzle. Three numbered covers sit on the board at the same time: a top pane carrying 8, a lower pane carrying 4 and a side glass gauge carrying 5. Every pit you complete knocks exactly one off all three, so the first minute is the cheapest scoring window on the level and the last two minutes are ordinary colour matching between three mouths.
Clearing this board takes about 3:20 of a 3:44 clock, which leaves roughly half a minute of slack at the end. That cushion is not luck: it comes from spending the opening purge properly, because the counters stop moving as soon as the pits get tall and the level turns into a slow fill-rate exercise.
Each screenshot below is a before/after pair taken from the clear above. The left frame is the board just before the change, the right frame is the same board after the sand has moved. Read the counter numbers, not the timer: they are what decides when the next part of the board opens.
Level 458 at a glance
| Detail | Level 458 |
|---|---|
| Difficulty | Expert |
| Timer | 3:44 |
| Colours on the board | Yellow, pink, magenta, purple, white, orange, brown, green, cyan |
| Counters at the start | Top pane 8, lower pane 4, side gauge 5 |
| First cover to break | Lower pane bursts at 0:16 |
| Longest cover | Top pane, survives until about 1:31 |
| Clear time | About 3:20 |
| Time left at the clear | About 30 seconds |
| Source run | The video solution above |
The three counters run down together, which is why the opening is a purge rather than a plan. In the first ten seconds they fall from 8 / 4 / 5 to 6 / 2 / 3; by 0:16 they read 4 / 1 / 1 and the lower pane bursts; by 0:24 the side gauge is gone. The top pane is the one that survives, and it survives on purpose, because it is the panel that seals the upper board.
The ten-step route
| # | Time | What happens | Where it happens |
|---|---|---|---|
| 1 | 0:04-0:10 | The first completions drop every counter to 6 / 2 / 3 | Top pane, lower pane and side gauge |
| 2 | 0:10-0:24 | The lower pane goes 2 to 1 and bursts at 0:16; the side gauge dies by 0:24 | Lower board |
| 3 | 0:24-0:40 | Top pane 4 to 3 to 2, and a fresh band of pits appears | Upper board |
| 4 | 0:40-0:56 | Magenta runs the bottom-left red bar to 60 percent | Bottom-left |
| 5 | 0:56-1:12 | The stall: new purple and magenta blocks restart at 0 percent | Whole board |
| 6 | 1:12-1:31 | The top pane bursts and is replaced by a pink-white pane at 2 | Top of the board |
| 7 | 1:31-1:54 | Pink fills the top; the cyan-green long bar clears at 1:54 | Centre |
| 8 | 1:54-2:15 | White, then orange; a brown side mouth appears at 2:14 | Centre and left |
| 9 | 2:15-2:44 | Red blocks clear, orange sand enters, the purple bar ends at 2:44 | Left and bottom |
| 10 | 2:44-3:20 | Grey, green, then cyan bars: board empty with 30 seconds left | Whole board |
Step 1 - Three counters, one tick (0:04-0:10)
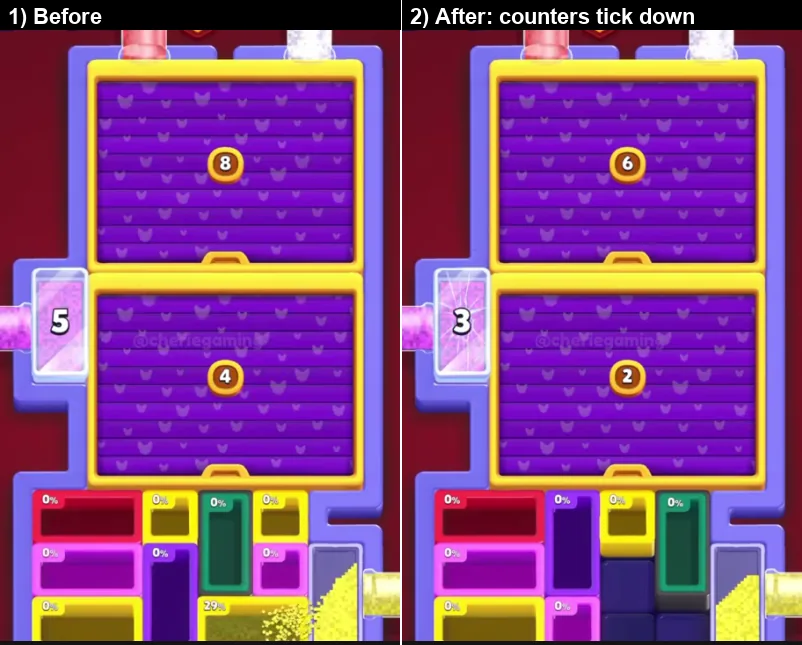
The level starts with yellow sand arriving from the right mouth onto the bottom pit row while the two purple panes and the side gauge stand at 8 / 4 / 5. The first completions in the bottom row knock all three down by two in a single tick.
- What to do: fill the shortest pit under the live mouth first and let the counter tick do the work.
- Why it works: every completion is worth two counters here, because there are two panes and one gauge all reading the same events.
- Do not: drag a tall pit into the stream in the first ten seconds. You need completions, not progress.
Step 2 - The lower pane bursts (0:10-0:24)
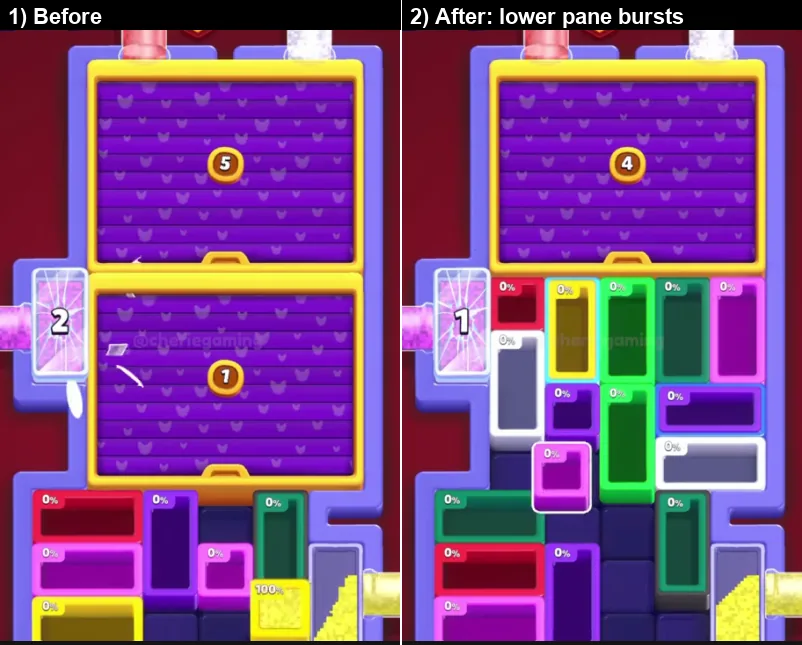
The lower pane runs 2 to 1 and bursts at about 0:16, and the side glass gauge follows it down to 1 and vanishes by 0:24. The board layer slides up as the cover goes, uncovering a group of green vertical pits, and the whole layout re-packs at about 0:24.
- What to do: keep the stream on the pits that are already partly filled so the burst arrives on time.
- Why it works: the burst is a free re-pack, so the pits you could not reach a second ago are suddenly in front of the mouth.
- Do not: celebrate the burst. Two counters are still alive.
Step 3 - Top pane 4 to 3 to 2 (0:24-0:40)
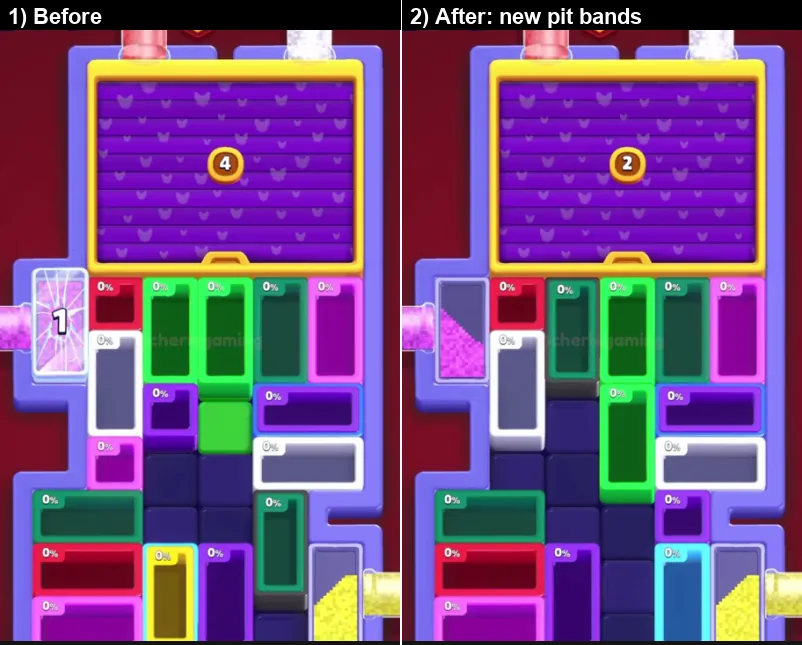
With two covers gone, the top pane becomes the only counter left and the board shows a fresh band of pits: red bars, magenta, cyan and yellow, all at 0 percent. The pane falls from 4 to 3 and then to 2 as the green blocks and cyan pits rise.
- What to do: treat the top pane number as your progress bar. Each pit completion subtracts exactly one.
- Why it works: with one counter left, the level's whole gate is now that single number, so any completion anywhere on the board is progress.
- Do not: park pits under a mouth whose colour does not match them. A mismatch looks busy and scores nothing.
Step 4 - Magenta into the bottom-left bar (0:40-0:56)
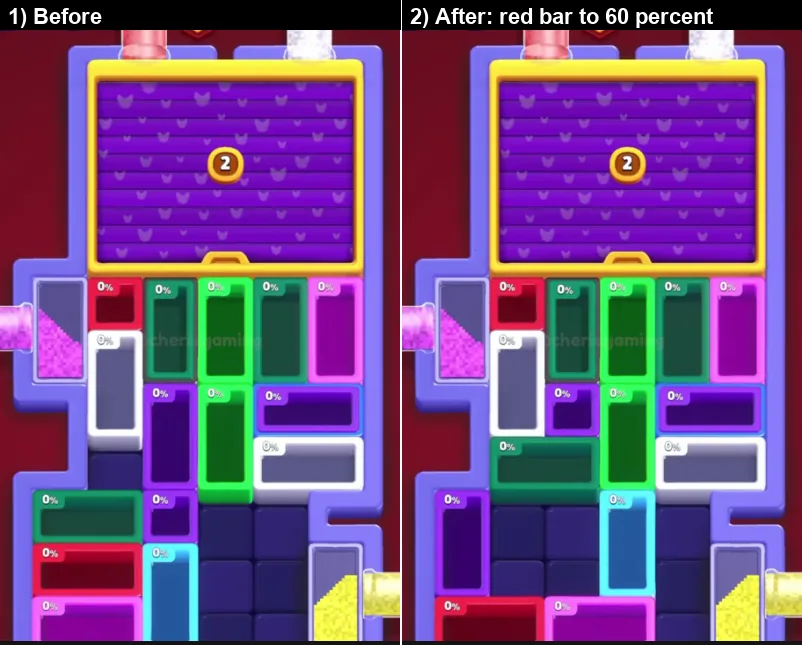
Magenta sand pours into the wide bottom-left bar and takes it to about 60 percent at 0:52 while the top pane holds at 2. A re-pack at 0:56 then swaps the layout for purple and cyan bars.
- What to do: only commit to a wide bar when you know no re-pack is coming.
- Why it works: wide bars fill slowly, so 60 percent of a bar is worth nothing the moment the board is redrawn.
- Do not: chase a bar across a re-pack boundary. Two small pits beat one half-filled bar here.
Step 5 - The stall (0:56-1:12)
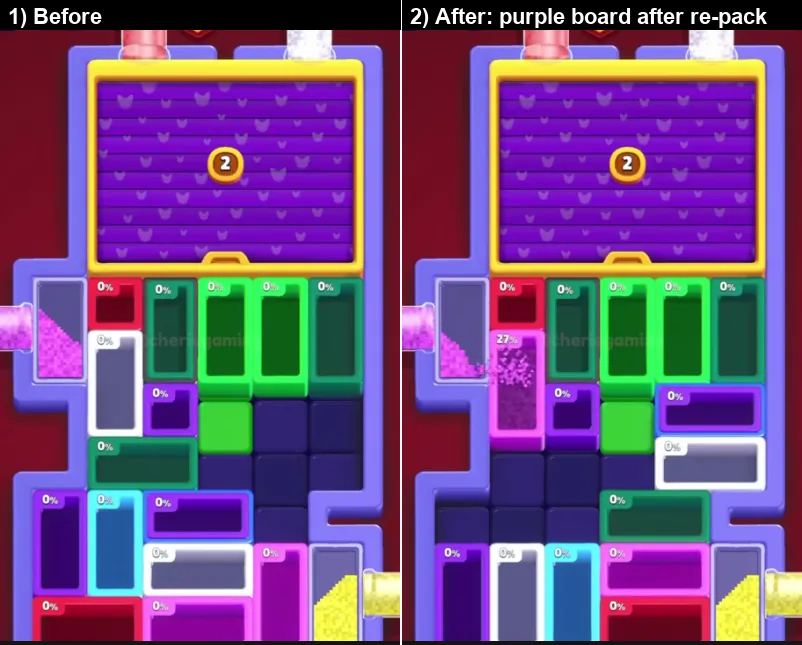
After the re-pack the new purple and magenta blocks all start at 0 percent and almost nothing fills. The top pane drops 2 to 1 at 1:12 on a single small completion, which means the whole segment produced one tick in sixteen seconds.
- What to do: use the stall to move the tallest remaining pit under a mouth.
- Why it works: the counter cannot move without a completion, and the completion needs the stream on it. Positioning is the only productive move available.
- Do not: keep dragging the same block between two mouths. Pick the target that finishes fastest.
Step 6 - The top pane bursts (1:12-1:31)
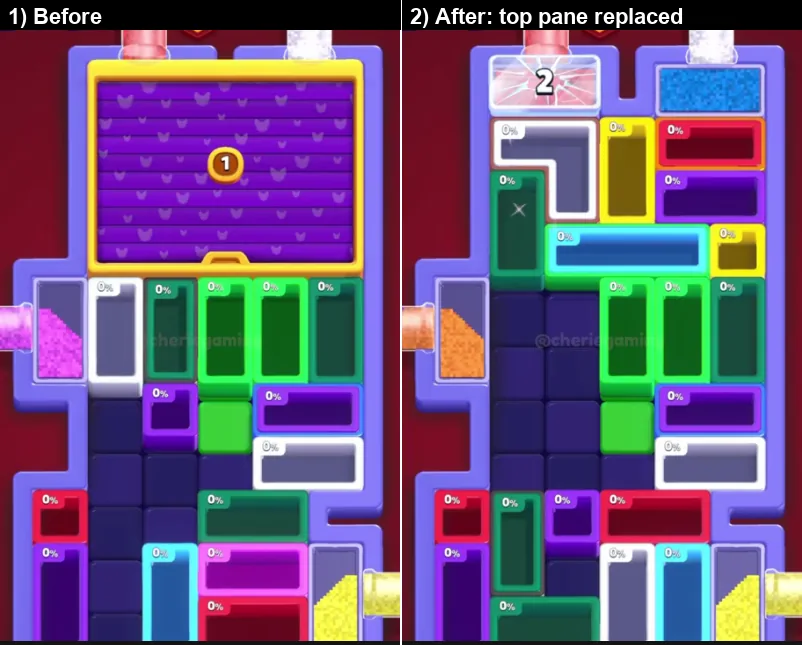
The top purple pane bursts at about 1:31 and is immediately replaced by a pink-white pane that starts again at 2. The board is redrawn in the same second and the left mouth begins running orange.
- What to do: stop working the top of the board and re-read the whole layout before the next drag.
- Why it works: a burst is a reset of the gate, not the end of it. Two more ticks are required before the upper board is properly open.
- Do not: assume the level is now about colour. The new badge 2 is still a counter.
Step 7 - The cyan-green bar clears (1:31-1:54)
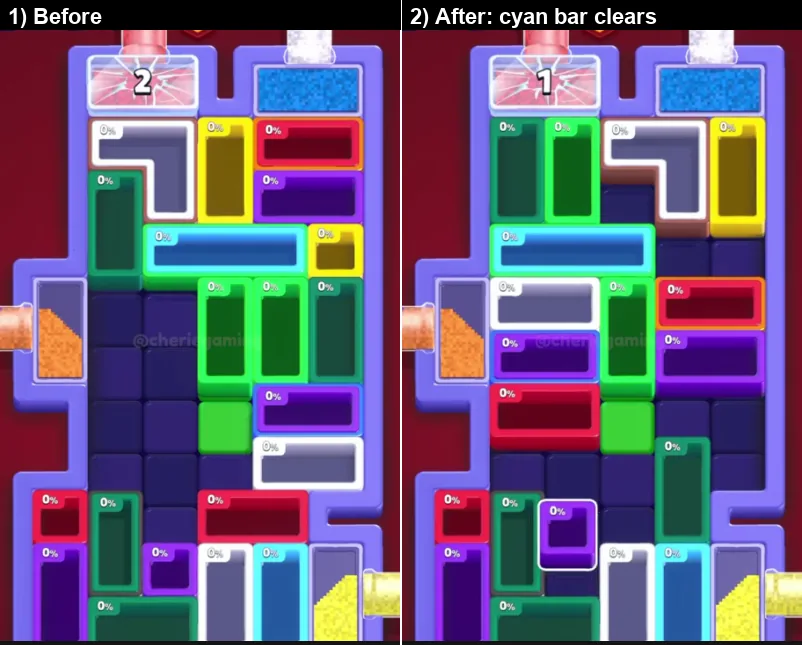
Pink sand fills the top of the board and the replacement badge drops from 2 to 1 at 1:42. The long cyan-green bar fills and clears at 1:54, taking the red and dark-purple bars with it and leaving large dark gaps in the middle.
- What to do: aim the stream at the long bar and hold it there.
- Why it works: long bars are the best carriers of a re-pack, because the pits next to them were fed by the same stream and finish in the same wave.
- Do not: break the stream to fix a corner pit. The bar is where the collapse is.
Step 8 - White, then orange (1:54-2:15)
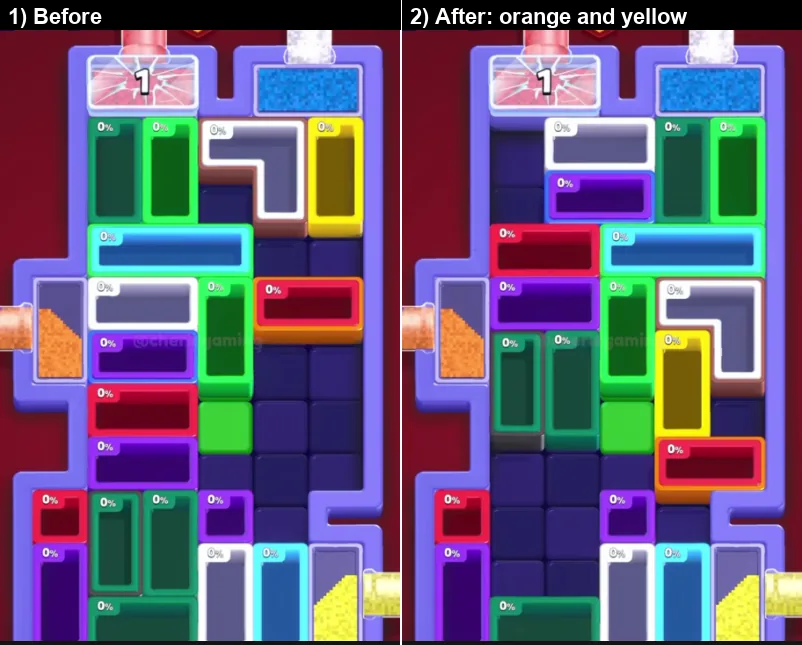
The top tube turns white at 2:00 and orange at 2:06. The yellow bar fills, and a brown mouth appears on the right at about 2:14, which is a new stream rather than a colour change.
- What to do: give the new mouth its own set of pits instead of moving the top-stream pits across the board.
- Why it works: three feeds at once is why the last minute of this level moves faster than the first two.
- Do not: ignore the brown mouth because brown looks like the grey pits. It is a separate supply.
Step 9 - The purple bar ends (2:15-2:44)
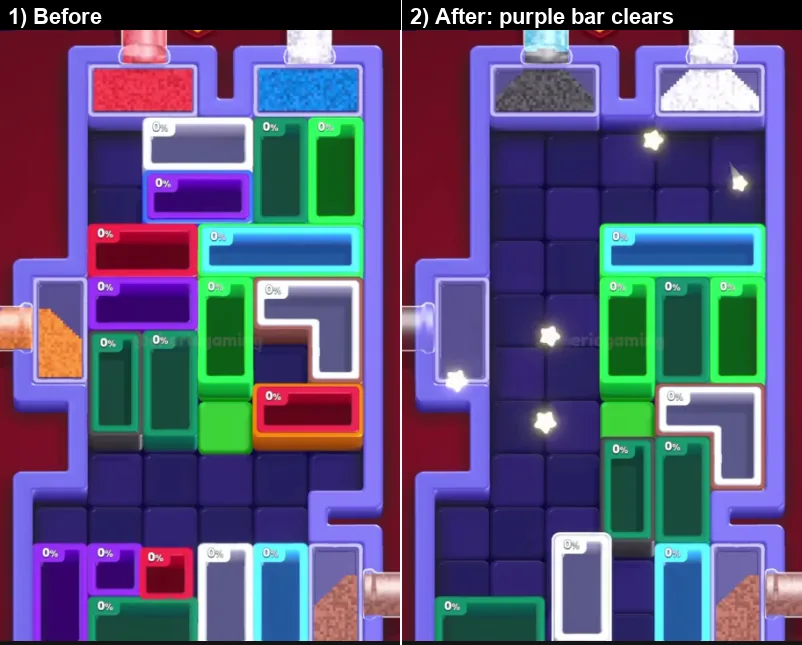
Red blocks clear at 2:30 and 2:32 with a star burst, orange sand enters at 2:34, and the bottom-left purple bar climbs from 56 to 58 percent before clearing at 2:44. Only green, white, grey and brown pits remain.
- What to do: keep orange sand on the orange blocks and let the purple bar finish in place.
- Why it works: with half a minute of slack, the risk here is a colour mismatch, not the clock.
- Do not: start a new wide bar at 2:40. There is not enough contact time left for it.
Step 10 - Grey, green, cyan (2:44-3:20)
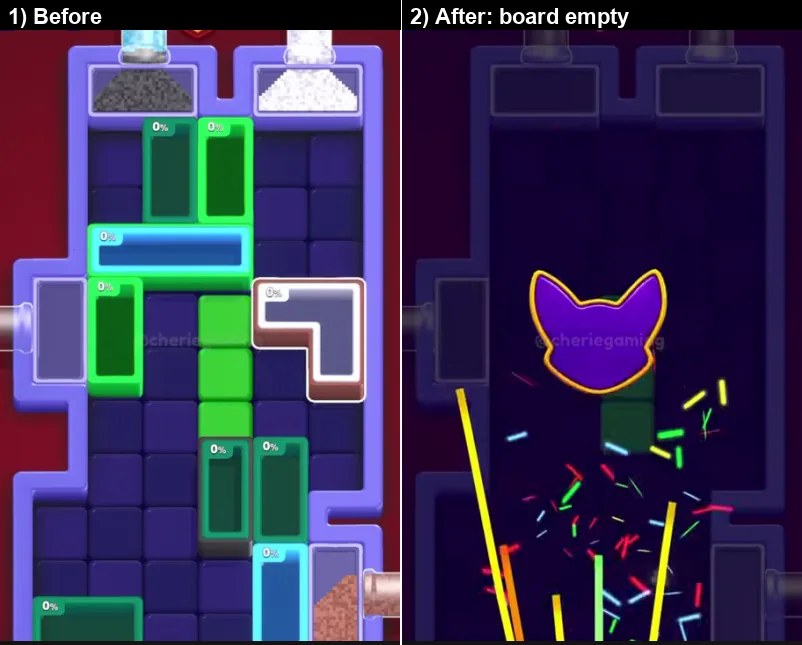
The green block brightens at 2:50, the grey-white pits are gone by 3:00 and the right mouth switches to green, which takes the green pit to 100 percent at 3:10. A cyan bar and a sliver of green are left, and both clear at about 3:20 with the timer reading 00:30.
- What to do: finish grey before green, because the grey pits need the white tail and the green stream cannot fill them.
- Why it works: the tail colours are the last thing you control; ordering them correctly converts the cushion into a clean finish.
- Do not: leave the cyan bar until after the green stream stops. It has no other supplier.
What each colour is doing
| Colour | Role on Level 458 |
|---|---|
| Yellow | The opening colour from the right mouth. It fills the bottom row while all three counters are still high, which makes it the cheapest scoring of the run. |
| Pink | The left mouth's first colour. It carries most of the first minute's work on the mid-board pits. |
| Magenta | Runs the bottom-left red bar to 60 percent before the 0:56 re-pack. Useful only inside one layout. |
| Purple | The colour of the blocks that appear after the 0:56 re-pack. This is the stall phase; nothing here restarts quickly. |
| White | The quiet colour from 2:00. It clears the grey-white pits, which you judge by what disappears rather than by what glows. |
| Orange | Top tube from 2:06 plus the left mouth. Small blocks with a high fill rate, which is why the endgame speeds up. |
| Brown | A brand-new right mouth at 2:14 rather than a colour change, so the board gains a third feed. |
| Green and cyan | The closing colours, finishing the last two bars at 3:20. |
Three rules that carry the level
- Counters reward speed, not care. Every completion knocks one off every counter. The first minute is worth three or four times a later minute, so spend it on short, certain pits.
- A wide bar needs a re-pack-free window. Long bars fill slowly and a re-pack erases them. Check whether the board is about to move before you commit.
- A burst is a reset, not a win. Both purple panes came back with a smaller number. After each burst, re-read the board before dragging anything.
Common mistakes on level 458
- Watching the timer instead of the counters. The three numbers tell you what the board is about to do; the clock only tells you how long you have.
- Dragging a tall pit in the first ten seconds. The opening is about finishing, not progressing, and tall pits do not finish.
- Treating the 0:56 re-pack as bad luck. It is scheduled. The purple and magenta blocks always restart, so the correct play is to park the tallest one immediately.
- Missing the brown mouth at 2:14. Ignoring a third feed in the last minute is the easiest way to finish with 00:05 instead of 00:30.
- Filling grey after green. The grey pits depend on the white tail, so reversing the order strands them.
Quick reference
Three counters at 8 / 4 / 5 -> first completions drop them to 6 / 2 / 3 -> lower pane bursts at 0:16, side gauge gone by 0:24 -> top pane 4 to 3 to 2 -> magenta runs a bar to 60 percent -> 0:56 re-pack and a purple stall -> top pane bursts at 1:31 into a new badge 2 -> cyan-green bar clears at 1:54 -> white then orange, brown mouth at 2:14 -> purple bar ends at 2:44 -> grey, green, cyan bars clear at 3:20 with 30 seconds left.
If you would rather watch the run than read it, the full video is embedded at the top of this page. Every timestamp in this guide refers to that recording, and the ten frames above are taken from it.
Where Level 458 sits in Sand Blocks
Level 458 is the 209th of 451 Expert boards in Sand Blocks: Drop Puzzle, and about 65% of the way through the 700 levels this guide currently covers.
Expert boards run from Level 250 to Level 700, and this page covers the 209th of them, in the earlier half of the tier.
It sits between Level 457 and Level 459, inside the 441-480 block of the level index.
The walkthrough above runs 3:29 and shows the clear start to finish.
More expert walkthroughs
View all →
Sand Blocks Level 458 FAQ
How do I beat Sand Blocks Level 458?
Follow the step-by-step walkthrough below. It splits the clear into ten key moments, shows the lock counts before and after each move, and gives the full green-to-red order for the 3:00 timer.
What difficulty is Level 458 in Sand Blocks?
Level 458 is rated Expert difficulty in Sand Blocks: Drop Puzzle — the 209th of 451 boards in that tier, and level 458 of 700 overall.
Is there a video walkthrough for Sand Blocks Level 458?
Yes — this page includes the full 3:29 video walkthrough, plus the written pull-order steps beneath it. You can also watch it directly on YouTube.
Featured walkthroughs
The levels players search for most - each with a full video guide.