Sand Blocks Level 459 Walkthrough & Answers
ExpertLevel 459 video solution · 3:17 · 1K views · published September 2026
Watch on YouTube →- Difficulty
- Expert
- In its tier
- 210 of 451
- Through the game
- 66%
- Walkthrough
- 3:17
- Views
- 1K
If Sand Blocks Level 459 keeps resetting on you, watch one correct run first. It is an Expert board that lands 66% into the 700-level run. One careful watch plus the numbered steps is usually enough to clear it on your own board.
Level board
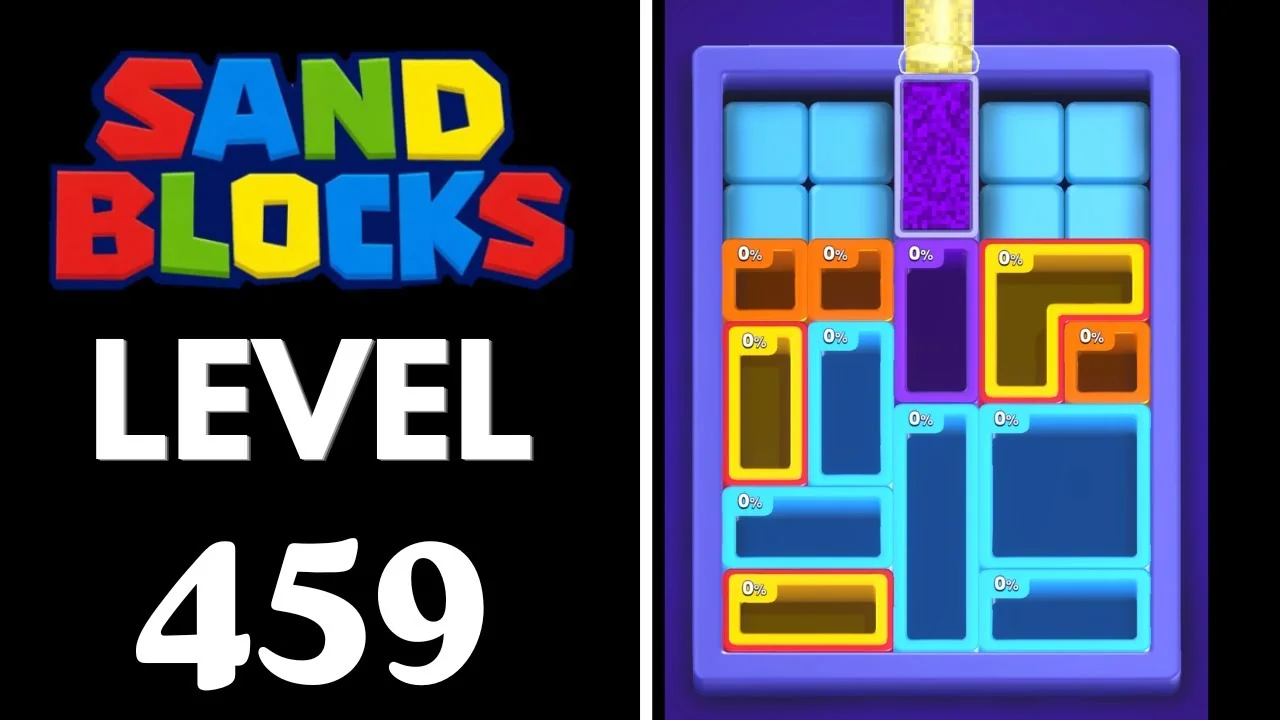
How to clear Sand Blocks Level 459
A frame-by-frame guide to Sand Blocks level 459: a single top tube runs seven colours in ninety seconds, the board re-packs every two seconds early on, and the last bar lands with seven seconds left.
Step-by-step walkthrough
Prefer screenshots to video? Every key moment of the clear is below in order, with a before/after frame and the lock counts either side of the move. Keep it open next to the game and follow along.
Level 459 is the fastest board in this batch. One tube feeds everything, the clock is 1:30, and the tube changes colour seven times in that window: purple, yellow, brown, pink, orange, red and finally a pale grey-blue. There is no side mouth, no second stream and no spare lane, so every pit you cannot reach from the top is a pit you will not finish.
The clear lands at 1:30 with about seven seconds on the clock. That margin comes from the opening forty seconds, where the board re-packs almost every two seconds and each re-pack drops a new pit straight under the stream. Miss those and the level cannot be recovered, because the late colours arrive with far less contact time.
The screenshots below are before/after pairs from the run above. The left frame shows the board before the change, the right frame shows it after: read them as a sequence of re-packs rather than as slow fills, because on this level the board usually moves in one jump.
Level 459 at a glance
| Detail | Level 459 |
|---|---|
| Difficulty | Expert |
| Timer | 1:30 |
| Colours on the board | Cyan, dark red, orange, brown, purple, yellow, gold |
| Sand feeds | One top tube only, seven colours |
| Tube order | Purple, yellow, brown, pink, orange, red, pale grey-blue |
| Clear time | 1:30 |
| Time left at the clear | About 7 seconds |
| Source run | The video solution above |
Because there is only one stream, the level is decided by how quickly you re-park a pit after each re-pack. Early on the board is generous: a pit finishes, the mosaic collapses, and the next target is already under the tube. Later, from about 1:10, the board thins enough that the same drag takes longer than the fill it enables.
The ten-step route
| # | Time | What happens | Where it happens |
|---|---|---|---|
| 1 | 0:04-0:10 | Purple, then yellow; the first pit fills within four seconds | Top-left and centre |
| 2 | 0:10-0:18 | Yellow chain: a gold pit fills at 0:12 and a dark-red pit appears | Left and centre |
| 3 | 0:18-0:26 | Brown sand arrives; four re-packs in eight seconds | Whole board |
| 4 | 0:26-0:38 | The cyan L grows under the brown stream | Left-centre |
| 5 | 0:38-0:48 | Ten seconds of pure dragging, then the board is replaced | Centre |
| 6 | 0:48-1:02 | Orange and brown pits thicken | Bottom and centre |
| 7 | 1:02-1:10 | The red group goes in three re-packs | Centre-right |
| 8 | 1:10-1:21 | Brown, orange, red carousel; an orange pit reaches 71 percent | Right and centre |
| 9 | 1:21-1:27 | The board collapses; sand turns pale blue-grey | Whole board |
| 10 | 1:27-1:33 | The last bar fills and the board empties at 1:30 | Left |
Step 1 - Purple, then yellow (0:04-0:10)
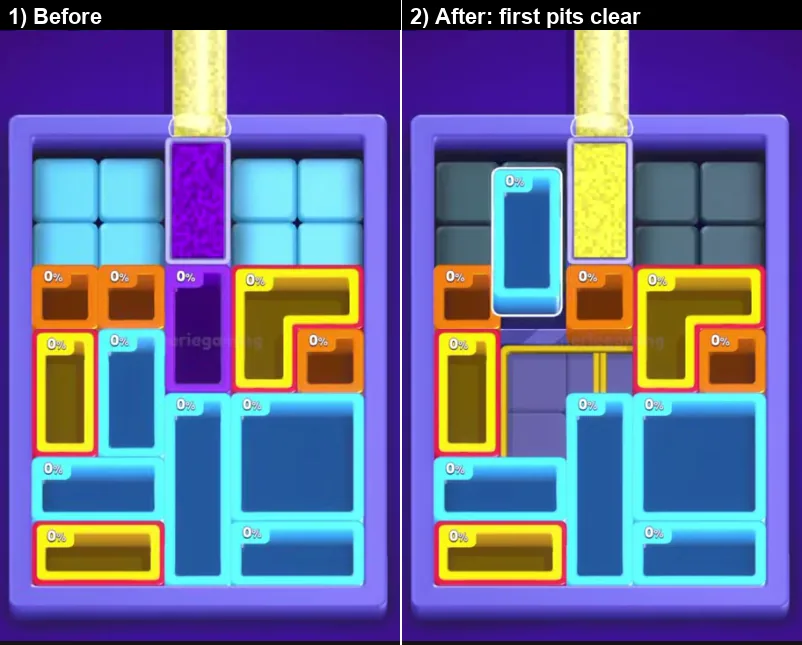
The level opens with purple sand in the tube that turns yellow inside three seconds. The first pit is filling at about 0:08, and a cyan block at the upper left turns blue as the board re-packs at 0:10.
- What to do: let the opening pit finish, then immediately look for the next shape the stream touches.
- Why it works: the first colour is a freebie, because the pit is already under the tube before you can react.
- Do not: start dragging during the first three seconds. You will move a pit out of the only live stream.
Step 2 - The yellow chain (0:10-0:18)
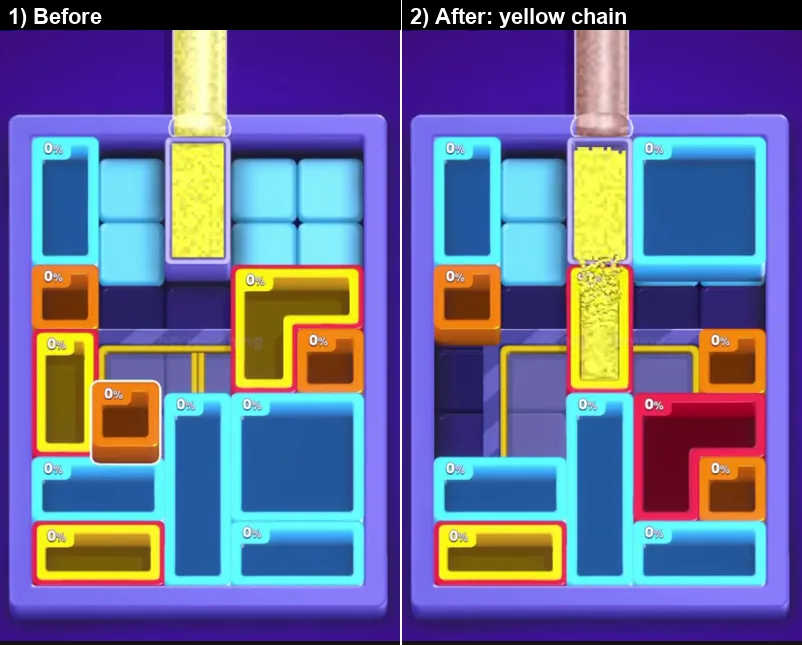
The gold pit on the mid-left fills at 0:12 and a dark-red pit appears at 0:14. The board re-packs at 0:12 and 0:14, and the top row starts to show grey empty cells.
- What to do: feed the small, close pits first. They are the cheapest scoring window of the level.
- Why it works: yellow pits are small and sit within one drag of the tube, so each one returns a fill in a couple of seconds.
- Do not: reach for the long bars yet. They need contact time you do not have in this phase.
Step 3 - Brown and four re-packs (0:18-0:26)
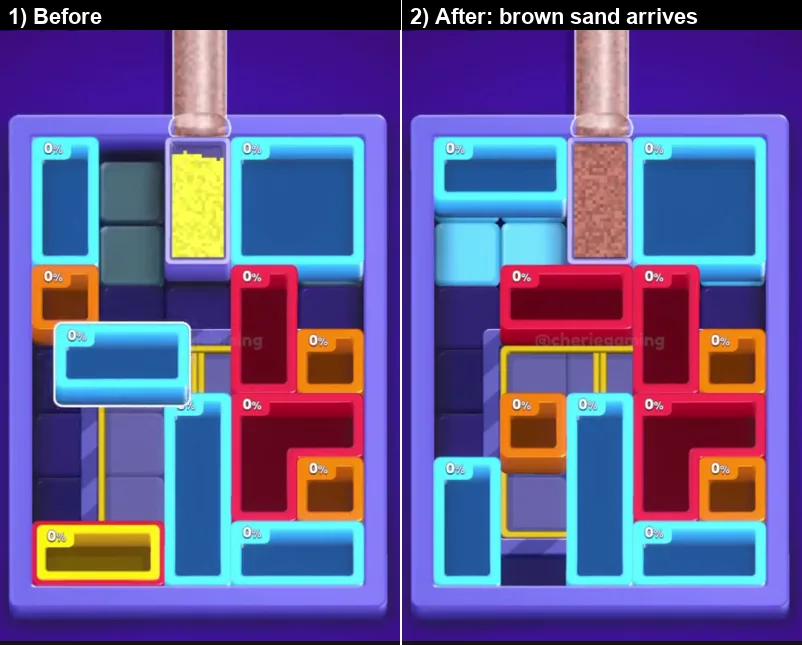
The tube switches to brown at about 0:18 and the board re-packs four times inside eight seconds: 0:18, 0:20, 0:22 and 0:24, with a fifth at 0:26. Red, orange and cyan pits vanish one after another and new 0 percent pits take their place.
- What to do: plan one move at a time. Pick the nearest pit to the stream and finish it.
- Why it works: at this speed the re-pack is the level's metronome. Two-move plans are always invalidated.
- Do not: try to protect a half-filled pit. If it survives the re-pack it keeps its progress; if it does not, the re-pack was coming anyway.
Step 4 - The cyan L under the brown stream (0:26-0:38)
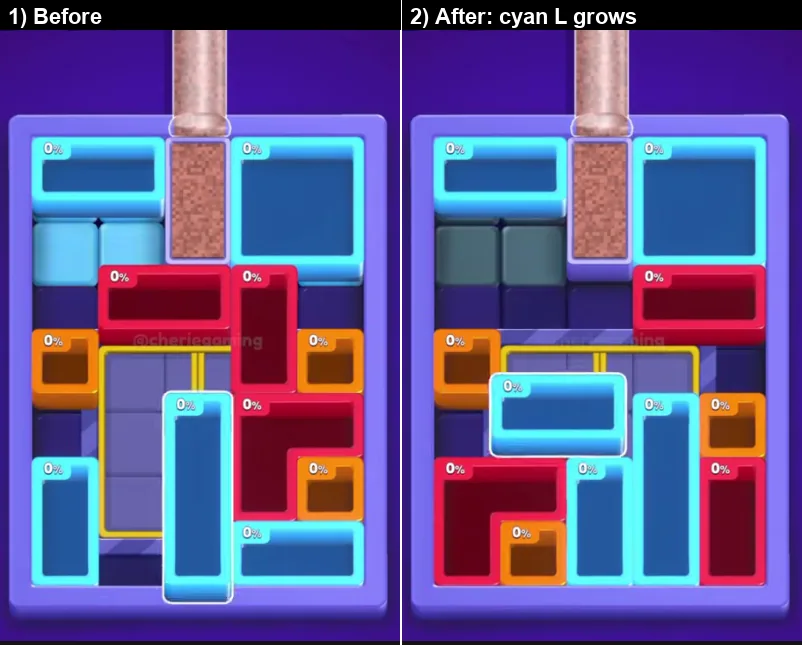
With the brown stream parked on it, the cyan L at the left-centre fills steadily and is nearly complete at 0:36. The board re-packs at about 0:38.
- What to do: leave the L where it is and resist reorganising the rest of the board.
- Why it works: an L is a wide shape, so it takes sand at a high rate once the stream is centred on it.
- Do not: swap the L for a narrow bar halfway through. The wide shape was the point.
Step 5 - The dragging window (0:38-0:48)
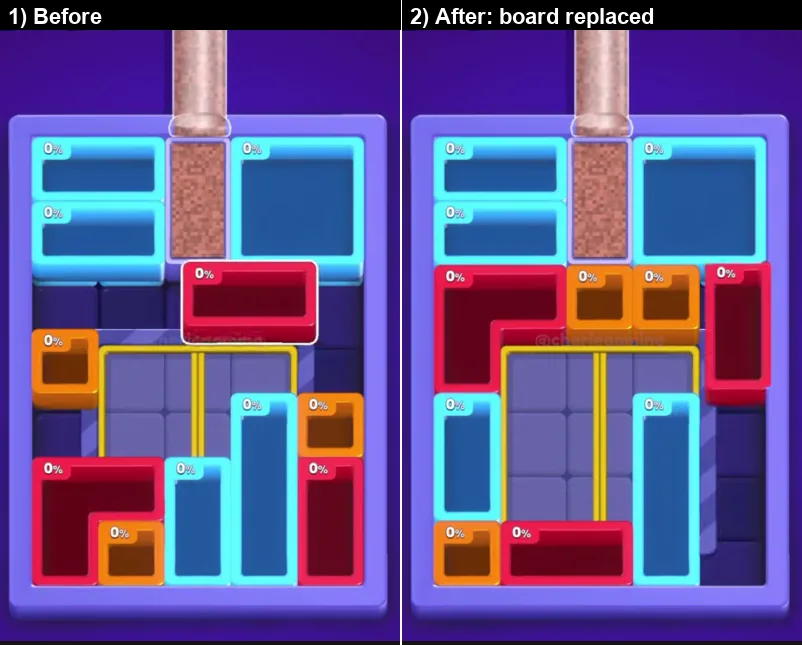
For ten seconds nothing fills: the player only drags a red pit around with the white selection outline. At about 0:47 the entire board is replaced, the yellow-framed glass cell disappears and three brown 0 percent pits appear.
- What to do: use the dead time to place a pit exactly under the tube, not to hunt for a better colour.
- Why it works: the board is going to be rewritten in ten seconds. Only the pit you park will be paid.
- Do not: read the layout as if it is permanent. Five of the six phases on this level end in a full replacement.
Step 6 - Orange and brown thicken (0:48-1:02)
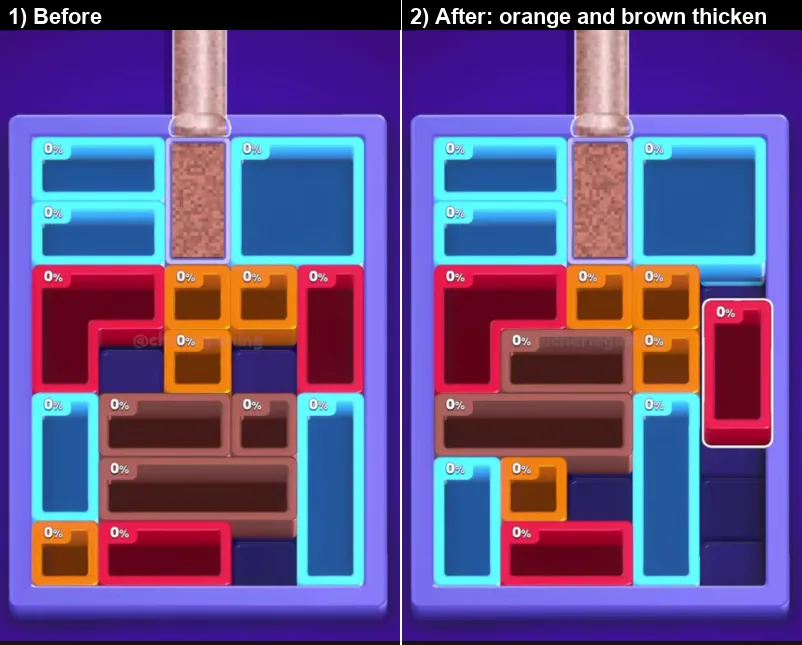
The orange pit thickens visibly, its share of the board rising by about half, and the wide brown bar along the bottom starts to take sand. Cyan and red pits barely move.
- What to do: start the wide bottom bar early and leave it running.
- Why it works: brown owns the bars in this phase, and bars need the longest contact time of any shape.
- Do not: split the stream between the bar and a corner pit. You will finish neither.
Step 7 - The red group goes (1:02-1:10)
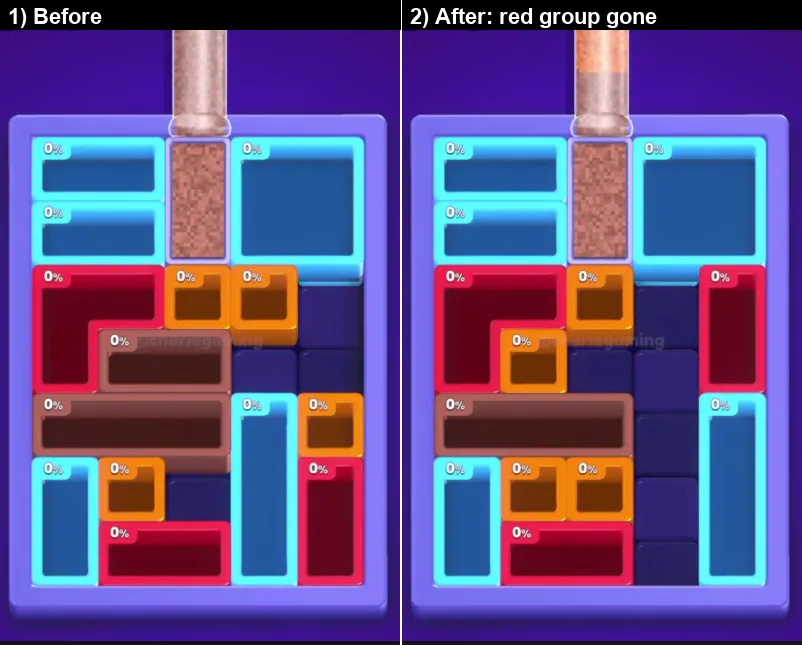
The red group disappears between 1:02 and 1:07 with re-packs at 1:00.6, 1:01.2 and 1:07.8, and the sand turns slightly pinkish. The board is swapped for deep brown bars plus grey-cyan vertical pits.
- What to do: watch the board rather than the tube. A colour that only tints the sand still counts.
- Why it works: the pinkish phase is short and easy to miss, but it is what removes the red set.
- Do not: assume the tube is still brown just because the stream looks brown.
Step 8 - The carousel (1:10-1:21)
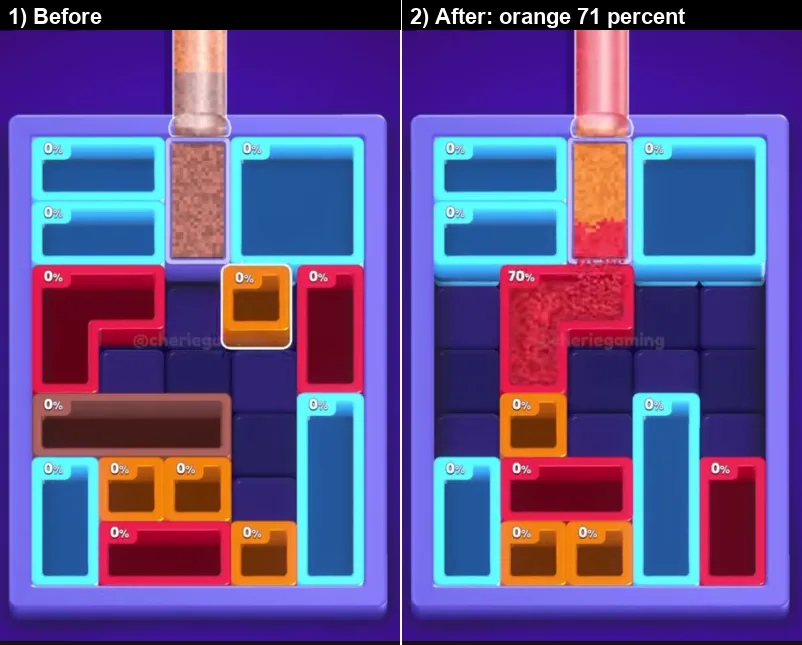
The tube runs brown, then orange at 1:18, then red at 1:20. An orange pit reaches 71 percent at 1:18 and a red block climbs to 19 percent at 1:20 before the re-pack at about 1:21 wipes the brown bars and the left red block.
- What to do: finish the orange pit while it is at 71 percent instead of switching to a fresh bar.
- Why it works: late colours arrive for a couple of seconds each, so the only pits that complete are the ones already close.
- Do not: panic when the sand turns red. The red block at 19 percent was never going to finish.
Step 9 - Collapse (1:21-1:27)
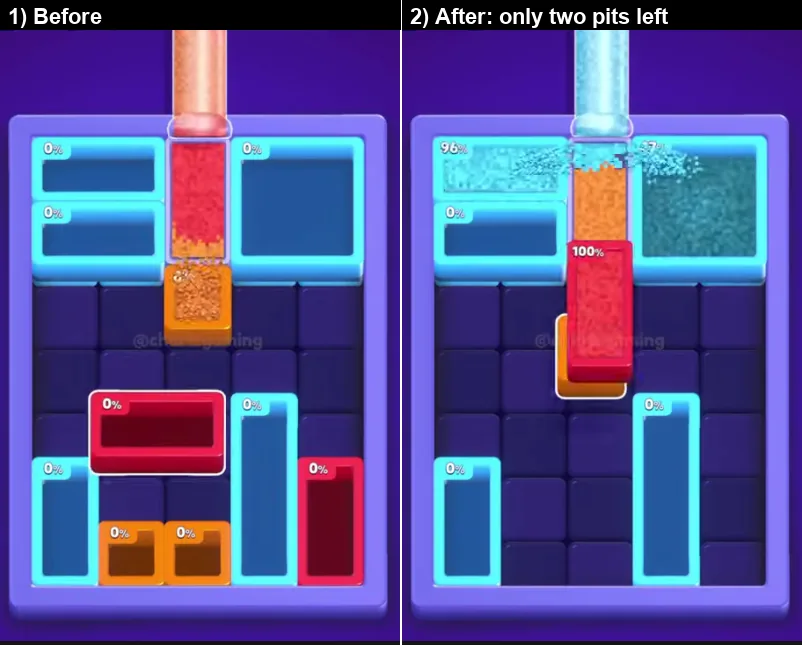
The sand turns pale blue-grey and most of the board is gone by 1:24. Only an orange square, a cyan L and one long bar are left.
- What to do: move straight to the long bar and leave the small shapes for the last seconds.
- Why it works: wide bars fill fastest and survive collapses best, which is exactly what a 1:30 clock needs.
- Do not: spend the collapse on a corner square you could finish later in one drag.
Step 10 - The last bar (1:27-1:33)
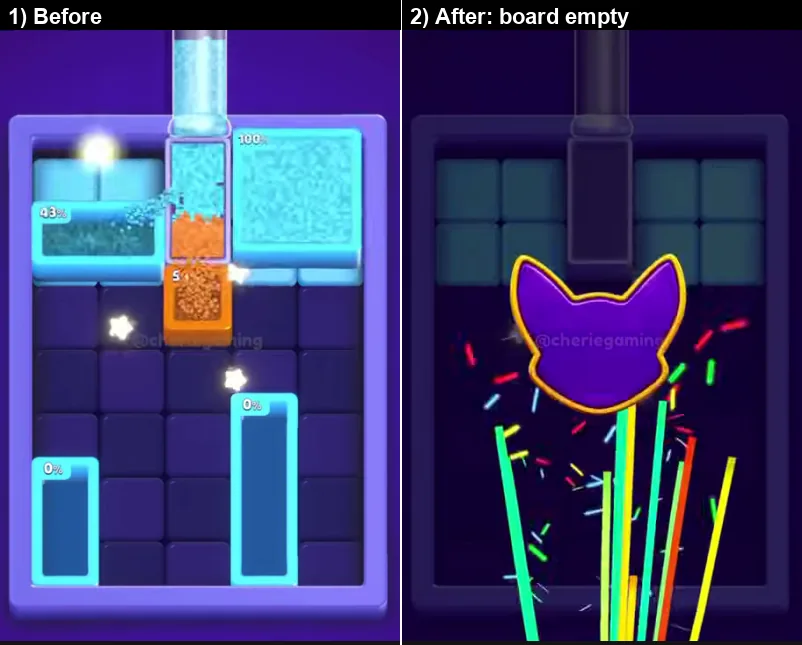
The long bar fills under the stream and the board is completely empty at 1:30 with seven seconds on the clock. The splash follows at 1:32 and the rewards card lists Rewards 40 and x2 Coins 80.
- What to do: hold the bar under the stream and do not touch anything else.
- Why it works: the level is one shape away from finished, and any drag risks a mismatch.
- Do not: clear the small shapes first. The bar is the item with the least remaining time budget.
What each colour is doing
| Colour | Role on Level 459 |
|---|---|
| Purple | The first three seconds only. It starts the first fill before you can act. |
| Yellow | 0:07 to 0:17. The gold and dark-red pits are small, close to the tube, and the fastest chain of the run. |
| Brown and rose-brown | 0:18 to 1:04. The longest phase: it drives the purge and the wide bottom bars. |
| Pink | A short tint around 1:04 that sets off the red group clear. |
| Orange | 1:18 and 1:22. A small, fast pit: finish it, do not switch to a bar. |
| Red | 1:20. One block reaches 19 percent and is scrapped by the next re-pack. |
| Pale grey-blue | 1:22 to 1:30. The closing colour, on the last long bar. |
Three rules that carry the level
- Re-packs are the metronome. Early on there is one every two seconds. Do not plan two moves ahead, plan the next pit.
- Watch the shape that moves, not the colour that is biggest. The stream is only ever on one or two pits; the rest of the board is scenery until it re-packs.
- Keep one wide bar for the end. Wide bars fill fastest and survive collapses, which is how a 1:30 clock turns into a seven-second finish.
Common mistakes on level 459
- Dragging during the opening three seconds. The only live pit is already under the tube.
- Chasing a half-filled bar through a re-pack. If the board moves, the progress is gone; small pits are the safe currency.
- Ignoring the pink tint at 1:04. It is a real colour change even though the stream barely changes shade.
- Switching away from an orange pit at 71 percent. Late colours last seconds, so near-complete pits must be finished first.
- Leaving two shapes for the last ten seconds. One bar is a comfortable finish; two shapes is a coin flip.
Quick reference
Purple, then yellow -> gold and dark-red chain -> brown arrives with four re-packs -> cyan L fills -> ten-second dragging window and a full board replacement -> orange and brown thicken -> red group gone -> brown, orange, red carousel -> collapse -> last long bar at 1:30 with seven seconds left.
The full run is embedded at the top of this page, and every timestamp above refers to it. The ten frames are taken from that recording.
Where Level 459 sits in Sand Blocks
Level 459 is the 210th of 451 Expert boards in Sand Blocks: Drop Puzzle, and about 66% of the way through the 700 levels this guide currently covers.
Expert boards run from Level 250 to Level 700, and this page covers the 210th of them, in the earlier half of the tier.
It sits between Level 458 and Level 460, inside the 441-480 block of the level index.
The walkthrough above runs 3:17 and shows the clear start to finish.
More expert walkthroughs
View all →
Sand Blocks Level 459 FAQ
How do I beat Sand Blocks Level 459?
Follow the step-by-step walkthrough below. It splits the clear into ten key moments, shows the lock counts before and after each move, and gives the full green-to-red order for the 3:00 timer.
What difficulty is Level 459 in Sand Blocks?
Level 459 is rated Expert difficulty in Sand Blocks: Drop Puzzle — the 210th of 451 boards in that tier, and level 459 of 700 overall.
Is there a video walkthrough for Sand Blocks Level 459?
Yes — this page includes the full 3:17 video walkthrough, plus the written pull-order steps beneath it. You can also watch it directly on YouTube.
Featured walkthroughs
The levels players search for most - each with a full video guide.